Argument Writing Toolkit- Adding Compelling Evidence

This is the last post of this blog series!  Phew! It’s been a ride- 8 posts!  Each detailing a different strategy for helping students who struggle with adding evidence to their argument writing.  Let’s recap what’s been covered so far:

If students quote chunks of text that are too large…

…then use this strategy, Allowing Your Writing to Shine.

If students struggle to cut block quotes because they feel all the information is important…

…then see these two posts on Trimming Down Important Block Quotes by Paraphrasing or Using Ellipses.

If students string together multiple quotes…

…then use one of the String of Quotes strategies that show how to Create Variety or Evaluate Evidence.

If students do not transition in or out of quotes…

…then see the post titled Writers Set Up and Unpack Quotes.


Today’s strategy is the foundation of all the above work.  The final strategy I will share is for students who are able to cite a quote, but their evidence is neither pertinent or compelling.  Choosing the best evidence to support a claim is imperative in the art of argument, so we must teach students how to select the evidence that best matches their purpose.

When a student uses uncompelling evidence, look at the source materials to discern the student’s logic.  More often than not, s/he chose the first reasonable quote found in the source.  The student did not postpone the decision of which quote to include until the source material was read.  It is important that we teach students to not jump too quickly at the first quote they see.  Instead, they should be patient- reading the source material further on the lookout for the BEST quote they can find.

To teach this strategy, I first show students how to read their work with a focus on quotes.  As students come to a quote within their piece, I have them reread the quote alongside their reason and ask themselves,

“Does this quote fit my reason?  Is there a stronger quote that could support this?”

The answers to these questions help students see whether their quote is sound or if they should look for a better fit.

0001 (11)

I model with my own writing how to use sticky flags as placeholders for where a stronger quote could go once further research is done.

Teaching Tool 1- Adding Compelling Evidence

Next, I return to the article to read further, mining for stronger quotes that support my claim.  I model how to mark, by underlining (or you could use a highlighter), potential quotes as I continue reading down the page.  I reinforce to students that sometimes the best quotes are buried deep within the article and that they should not be too quick when choosing a quote.

Teaching Tool 2- Adding Compelling Evidence

Once I’ve reread the article and found some other possible quotes, I show students how to choose the best piece of evidence by referring back to this class chart:

Teaching Chart- String of Quotes- Evaluate Evidence

Follow up your teacher demonstration with time for students to do the work.  Have them reread their piece with a critical eye toward included quotes.  If any are weak, they should return to the source material to find a more pertinent quotation to include in their piece.  As always, encourage students as they return to independence to keep this strategy in mind.  🙂

I hope that you found this series practical and helpful for your everyday classroom use.  Looking forward I would like to share based on what YOU need.  So, my next post will be based on the results of the poll below.  What are you working on now?  Let me know what you would like my next post to be about!


Let’s keep the conversation going-

Lindsay

Argument Writing Toolkit- Transitioning In and Out of Quotes (Unpack)

Picking up right where I left off from my previous post… We can help students who plop quotes into their writing with no introduction or explanation by teaching them how to both set-up and unpack the quote.  I’ve already shared a strategy for how to transition into quotes.  You can see how to transition into or set-up quotes in my previous post (here).  This post will share how to do the second part, transitioning out of or unpacking quotes.  So, let’s get right to it!

After students set-up their quotes, it is imperative that they unpack it.  When a student unpacks a quotes, s/he explains its significance, connecting the quote to their claim by explaining their thinking.  Super hard and super academic work that many students struggle with!  How many of you have seen student writing that looks like this?

Squeaky is fiercely protective of her brother Raymond.  She always sticks up for him.  For example in the text Squeaky narrates, “But now, if anybody has anything to say to Raymond, anything to say about his big head, they have to come by me.”  This shows that she is protective.

Not exactly the level of scholarly writing we expect from our students….

However, with a few well-placed thought prompts student can really  push their interpretive thinking, allowing their voice to shine through.  That premise is what this small-group lesson is modeled off of.  Especially in an argument essay, we want to ensure that the writer’s voice is heard above all else.

So, I begin with this teaching point:

Teaching Point- Transition into Quotes- Unpack Quotes

Then, I follow that up with an example of my own writing that exemplifies the struggle that I am tapping into.

first try

In this sample, I’ve included very little of my own voice, nor have I explained to my readers why or how these quotes connect to my main point.  But using prompts I can begin to push my thinking and explanation.  I shared suggested prompts with students on a small teaching chart.  (Make sure to look back at my previous post, here, to see some thoughts around prompts- you can find it under the prompt chart image.)

0001 (10)

Using sentence stems to push thinking is really powerful.  For struggling students you can also practice this work orally.  Have students talk out their ideas, and as they talk voice over the prompts encouraging them to say more.  This process of working to say more really allows students to stretch their thinking down new avenues.  You can practice this regularly in the classroom by having students free write in their reading notebooks, using prompts to grow ideas.

During my small group, I modeled this thinking aloud, using the prompts to “say more” about each quote.  I captured some of my work on paper, so that I now have a revised paragraph to show students.

second try

Round out your small group time by giving students the opportunity to do this work with your support.  While other group members are working, have each student orally unpack each quote.  Encourage the student to say more by coaching in with the prompts.  When a solid line of thinking is established, have the student write it down for their essay.  Repeat this process with each group member.

And that’s it!  There is just ONE strategy left.  Check back soon!

Let’s keep the conversation going-

Lindsay

Argument Writing Toolkit- Trimming Block Quotes (Ellipses)

My last post outlined one strategy to help students trim long block quotes from their writing pieces (see that post here), and this post will show another.  Remember these strategies are for students who struggle with cutting down a long quote because they feel that their reader needs all the information in the quote.  Therefore, the strategy of omitting unimportant parts from the quote (which you can see here) is not useful for this crop of writers.

I’ll begin by sharing the teaching tool I use to teach this strategy, and then I’ll follow up with a few words of caution about using ellipses.

My teaching point for this work is pretty straightforward:


Teaching Point-Trimming Down Quotes- Elipses

The orange sticky flags alongside the teaching point are ellipses I use when modeling.  Students can also use them during the small group to make the lesson a bit more tactile.

Like my previously shared strategies, I start by showing a sample of my own writing that personifies the problem these students have– too much quoted text within a paragraph.  However, I empathize with them about how important I think the quote is and how difficult it would be to cut any part of it because it ALL seems so important.

IMG_5698

I explain to the students my thinking–how in this example, using ellipses would be the best strategy to use as opposed to paraphrasing because of the way the quote is comprised of a long list.  When reading this quote, my audience can easily get bogged down and lost in the list.  As a writer, I made the decision that although all the details are important, my audience will get the gist of what I mean if only a few are listed.

Next, I talk through my thinking of which part of the quote I would omit and replace with ellipses.  I model how to strike out that section and then I replace it with an ellipses sticky.  This way students can visually see the editing moves being made.  I, then, followed that up with a clean version incorporating the change.

Teaching Tools- Trimming Down Quotes- Elipses

Notice how the proportion of quoted text to my own writing is improved with the use of ellipses.  In my first try, the quote takes up about one third of my paragraph!  That’s not enough of my voice.  My second try, however, has a much better balance.

As always, this small group is rounded out with a time for students to try this work in their writing pieces with me coaching in.  I usually let them work for a few minutes, while I scan or walk the room, then check back in.

A word of caution about using ellipses.  You have to warn your students that ellipses, when used incorrectly, can alter the meaning of the quoted text.  So as writers, they need to stay true to the author’s original intent or emphasis.  For example, look at this example of an original quote (highlighted in yellow) and use of ellipses (on the pink sticky):

Teaching Tools- Trimming Down Quotes- Elipses Extension

Notice how the writer misused the quotation.  By eliminating the beginning and end portion, the meaning of the entire quote is skewed.  The quote is actually pointing out how non-concussed players had impaired brain functioning, but it can easily be manipulated to seem like it is showing how concussions lead to impaired brain functioning.

It is important that we warn students of this when we are teaching the use of ellipses for trimming down block quotes.  I usually have students ask themselves a question to make sure that they are staying true to the original intent of the quote:

Does this keep the essence of what the author was trying to say, or does it change it?

Try this strategy out!  Let me know how it goes!

There are only two strategies left.  Follow to see the rest!

Let’s keep the conversation going-

Lindsay

Argument Writing Toolkit- Trimming Block Quotes (Paraphrase)

Hello!  Happy New Year!

I hope that everyone had a happy and healthy holiday season.  It sure was a busy one!  I promised to post after the holidays and had every intention of getting back to you last week.  However, as you may know the East Coast was hit with a “bomb cyclone” and my school district had TWO snow days on Thursday and Friday.  So…in the past 16 days I’ve  only had one work day. Wow!

But let’s get back to it!

Today I’d like to share another tool for helping students add evidence to their argument pieces.  This strategy is for students who have included block quotes that are too large in their writing.  Remember, a good rule of thumb is that quoted text should only take up about 5-10% of the writing.  The difference with this cohort of students is that they  feel like they can’t cut the block quote because the information is important for the reader to know.  So, these writers cannot use the previously shared Allow Your Writing to Shine strategy, of striking to omit parts of quote that are deemed unimportant.

To solve this problem, students can choose to either paraphrase parts of the quote or use ellipses.  Today’s post will highlight how I teach students to paraphrase their quote (how to use ellipses will follow).

0001 (2)

I began this small group with the teaching point pictured below and by showing students a piece of my writing that had an overly large portion of quoted text:

Teaching Point-Trimming Down Quotes- Paraphrase

IMG_5687

Then, I demonstrated how I chose parts of the quote to paraphrase.  I modeled how to strike out the chosen sentences and then rewrite them in my own words.

Teaching Tools- Trimming Down Quotes- Paraphrase

Next,  I shared a revised version of my original writing that incorporated the paraphrased sections of the quote.  I pointed out how my entire paragraph had to be reworked a bit as opposed to just plugging in the paraphrased sentences.

Teaching Tools- Trimming Down Quotes- Paraphrase

Finally, as always, I finished this group by letting students have a go.  Each worked right in front of me on trying this strategy as I coached in and addressed any individual needs.

There you have it! Have your tried any of the strategies I’ve shared with your kiddos?  How did it go?

Let’s keep the conversation going-

Lindsay

P.S. Like what you see? More tools to come- Follow along!

Argument Writing Toolkit- String of Quotes (Ranking Evidence)

Following up from my last post, another strategy to help eradicate a string of quotes in student writing is to evaluate/ rank evidence.  The idea is that not every piece of evidence needs to be presented within the argument, but rather the piece of evidence that packs the most punch.  So in this small group you are working with students to evaluate the evidence they included in their writing and helping them rank it from strongest to weakest.  This allows students to present the evidence that best matches their point.

As always, this small groups began with a teaching point:

Teaching Point- String of Quotes- Evaluate Evidence

Then I showed a piece of my writing for demonstration:

Teaching Tool 1- String of Quotes- Evaluate Evidence

Next, using the chart that goes along with our unit of study (from The Reading and Writing Project’s 7th grade Argument Unit- The Art of Argument), I worked with students to rank each piece of evidence.  To add a kinesthetic touch, I have students sort text evidence strips– putting the piece of evidence that works best at the top (closest to the reason) and the weakest at the bottom.

Teaching Chart- String of Quotes- Evaluate Evidence Teaching Tool 2- String of Quotes- Evaluate Evidence

The beauty of this teaching tool is that there is no right answer.  I let the students come to whatever conclusion they decide on as long they have sound reasoning that they can explain.  Too often kids are hung up on figuring out what “our” right answer is and they don’t have the confidence to productively struggle through the process.  It is important that we give them open-ended opportunities to build those muscles.

Finally, students try this work on their piece.

Give it a try.  Let me know how it goes! 🙂

I hope that you all have a happy and safe holiday.  I’ll be back with more strategies after the New Year!

Let’s keep the conversation going-

Lindsay

Argument Writing Toolkit- String of Quotes (Create Variety)

Sometimes in student writing you will see a string of quotes, where students move from one quote to the next to the next without a break in between.  These students are usually struggling with how to create variety in their inclusion of text evidence or how to evaluate and choose the most effective piece of text evidence.  So this tool is actually two strategies that would be taught separately.  Students could use either strategy to eradicate a string of quotes.

0001 (1)

In this post, I’ll share the first strategy to create variety (you can see the second strategy to rank and evaluate evidence here).

To begin, the teaching point is:

Teaching Point- String of Quotes- Create Variety

I demonstrated this strategy by modeling the process with my own writing.  First, I shared a piece that portrayed the problem.  My first try has 5 quotes back to back, which all essentially say the same thing– that competitive sports cause injuries.

try 1

Next, I referred to the String of Quotes teaching chart (the first image from above) to show some of the ways that students can create variety when including text evidence into their piece.  I modeled how to change each of the quotes using ellipses, paraphrasing, listing/citing sources, etc.  My new paragraph looked like this:

try 2

I used small sticky flags to point out the different techniques used to create variety.   I also shared a teaching chart with the students that exemplifies those same techniques.

String of Quotes-Create Variety

Finally, students worked on adding variety in their own piece by finding a paragraph that had a string of quotes, choosing a technique to try, and revising their piece while I coached in.

What do you think? Try this out in your room.  Let me know how it goes! 🙂

Next time, I’ll share how you can help students avoid a string of quotes by evaluating and using the most effective piece of evidence.

Like what you see? More tools to come- Follow along!

Let’s keep the conversation going-

Lindsay


Argument Writing Toolkit- Shortening Quotations

A common struggle for students when incorporating text evidence into their arguments is they choose quotes that are too long.  Then the piece becomes dominated by a voice other than the author’s.  It’s important to strike a balance between one’s own voice and that or the article quoted.  In argument writing, the author should highlight his or her opinions and reasoning.  A good rule of thumb is that the evidence should only be about 5-10% of the piece.

To help students strike this balance, I put together a small group titled, “Allowing Your Writing to Shine”

At the start of the small group, I began by sharing the teaching point:

Teaching Point- Using Key Portion of Quote

Then I showed students my first try with the original text evidence/ quote highlighted.  This allowed students to see just how quote heavy my original work was.  Next I modeled how I reread to pull out and focus on only the key portions of the quote.  Right in front of students, I used a sharpie to strike out the extraneous parts of the quote– all the while demonstrating my thinking process.  Finally, I unveiled my newly revised second try, which portrays a much better balance between my voice and the quote.

Teaching Tool using Key Portion of Quote

After my demo, I had students point to a paragraph in their own writing piece where they felt text evidence outweighed their voice; and right in front of me, they began the work that I just modeled. While they did this, I coached into their work. Finally releasing the students when they seemed to get the hang of it.

I shared a teaching chart to help students visualize this strategy:

0001


So in my kit, I house all pieces of the lesson in a sheet protector, which I then keep in a binder that I carry with me around the room.  The writing samples always stay the same.  I pull  out “clean” versions each time I need to teach the lesson, and I make the same teaching moves.

Try this out in your room.  Let me know how it goes! 🙂

Like what you see? More tools to come- Follow along!

Let’s keep the conversation going-

Lindsay

Argument Writing Conferring Toolkit Series

Thinking ahead is SO important.  As teachers, we are masters of keeping our feet firmly planted in the now, while our eyes look toward the future.  Simultaneously, we plan, prepare, and perfect current and next units of study–always asking, “What do my students need to be successful in this work?”

Argument writing is on the horizon, and to prepare for the unit, I’ve been working on a conferring toolkit.  In case you are unfamiliar with a conferring toolkit, it is a collection of tools to aid in the teaching of reading and/or writing strategies.  The toolkits can be used both during individual conferences or in small groups.   They might include marked up demonstration or anchor texts, annotated sample writings, teaching charts, rubrics, checklists, etc.

While thinking about the upcoming Argument unit, I recalled past student struggles as well as potential pitfalls .  One major hang up for students is how to effectively add text evidence into their argument.  In past years, this difficulty has popped up due to a myriad of common predictable problems all of which can be addressed with the following strategies:

Adding Evidence Strategies

But what tools do I have to teach these strategies??

Enter the conferring toolkit!!

Follow this Argument Writing Conferring Toolkit series as I share some of the teaching charts and tools I created to support students in this work!

Let’s keep the conversation going-

Lindsay

The Burning Vocabulary Question Series: How do I teach vocabulary?

Happy New Year, to all!  My apologies for the long delay!  What’s my New Year resolution?? To not let so much time lapse between posts!  (lol).  Let’s get right to it!

If you forget where we left off, you can review the last two posts: The Burning Vocabulary Question Series: Where do vocabulary words come from? and The Burning Vocabulary Question Series: Which words do I teach?

So at this point, you’ve gathered a collection of words from authentic sources and you have chosen the best words for instruction.   Now, there is only one more question left to answer:

How do I teach the chosen vocabulary words?

Past vocabulary practices have been very teacher driven, where students are passive recipients of word knowledge. This usually includes:

  • vocabulary lessons confined solely to literacy time.
  • instruction governed by a commercial program’s manual.
  • approaches that are either definitional (looking up the meaning in a dictionary) or instructional contextual (briefly introducing words prior to assigned reading).
  • approaches  that assume that students have prior knowledge of  the topic.
  • words presented only once, with little time for deeper understanding.

As many of us implement reading and writing workshop within our classroom, we realize that the above mentioned practices are not the most conducive to how students learn best. For example, many of these practices conflict with known understandings of what 21st-century students need.  Within the workshop classroom, students are now at the center, where they can actively engage with their own learning.  This shift calls for some changes to our instructional practices when it comes to vocabulary.  Research has recommended a few differing practices:

  • a comprehensive approach, where vocabulary instruction is not an isolated event.
  • instruction that is dispersed across the school day.
  • active engagement by the student during vocabulary instruction.
  • allowing multiple opportunities to work with the words in different contexts.
  • placing emphasis on expanding student prior knowledge.
  • fostering strategies for independent word learning.

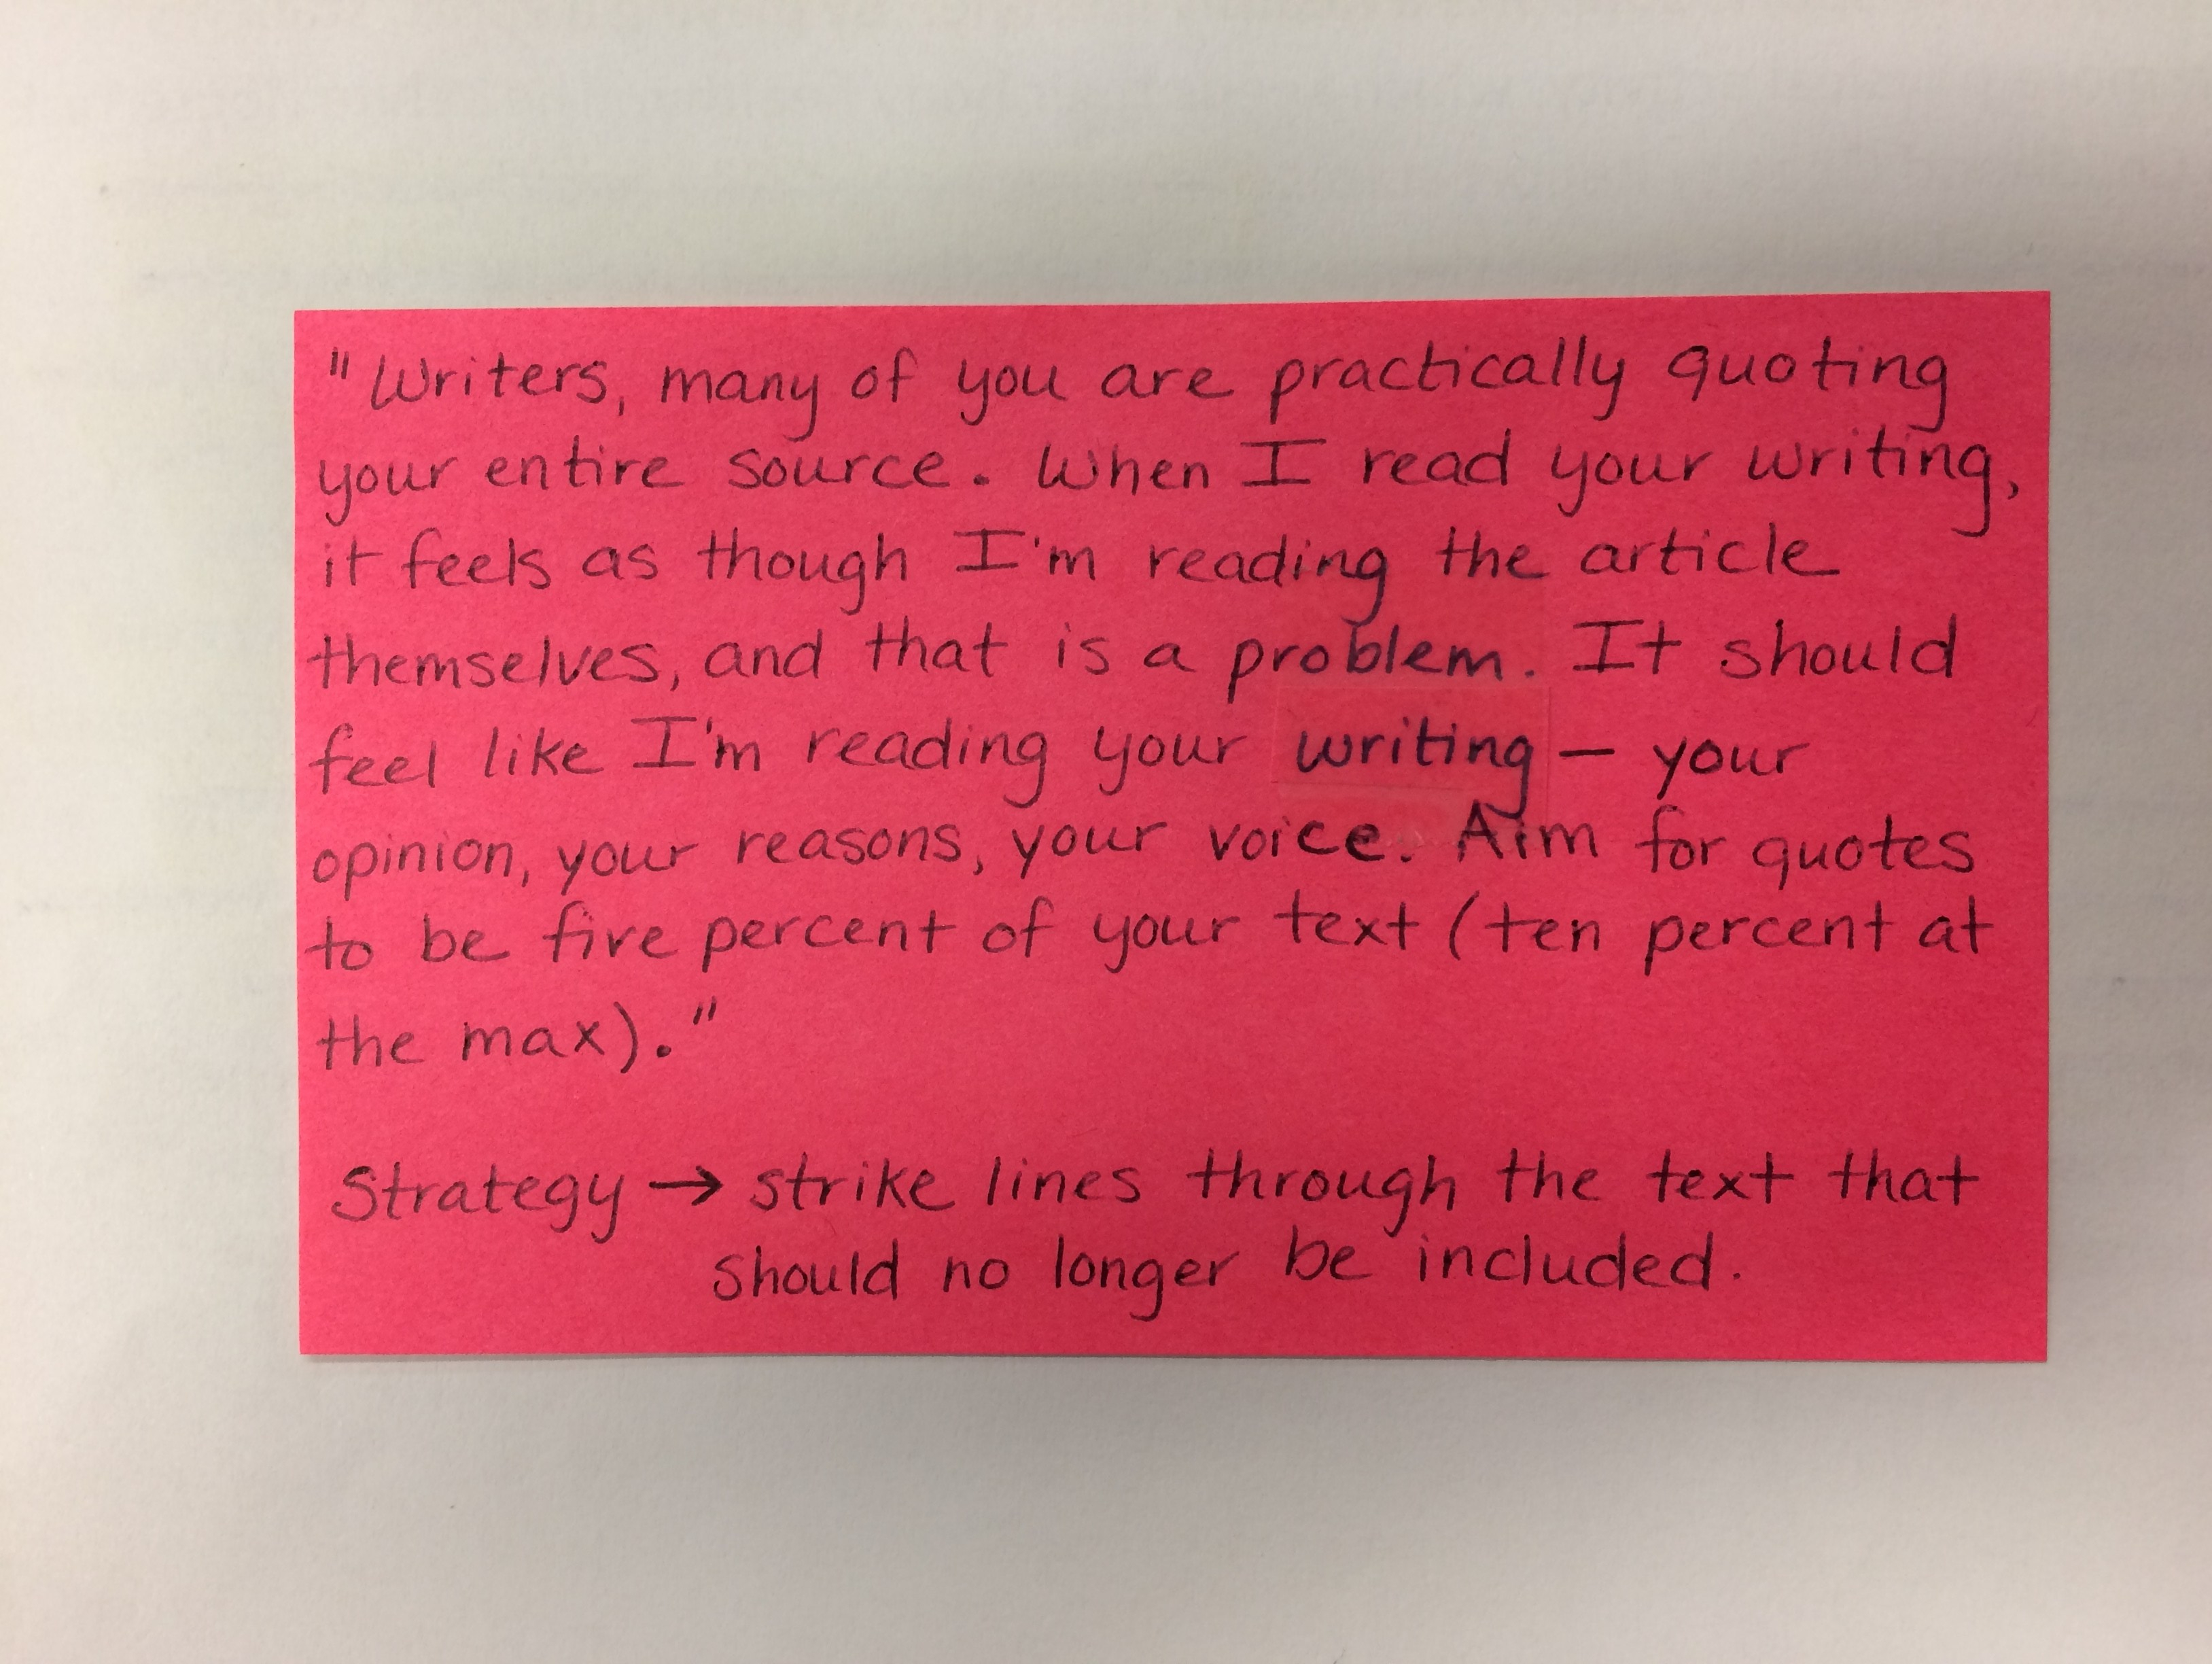
I’ll take a moment to note that although I believe in the workshop model, I disagree with the notion that vocabulary is learned incidentally through exposure to words in reading materials.  Practically, and through time spent in the classroom, I just don’t think “osmosis” is enough.  Hardcore workshop proponents might argue with me, questioning whether explicit instruction is inauthentic.  However, the word gathering means described in the first post of this series, The Burning Vocabulary Question: Where do vocabulary words come from?,  create an authenticity for learners.  Also students will come across many of the explicitly taught word in their independent reading and will use the words in their writing.  By making vocabulary instruction a part of each day, students will begin to notice words, and make learning and using them a part of their daily lives.  Which I believe, is in fact, very authentic!

I find it most helpful in the classroom, to start with an instructional framework and stick with it for a period of time.  The consistency provided gives the opportunity to streamline implementation routines and create a habit.  That being said, time should be spent creating a framework that works for you, within your daily schedule.  The focus should be kept on creating a framework for fast-paced, yet varied experiences with words, where multiple review opportunities are available to develop deeper understanding of the word meanings.

Your framework should have three components.

  1. Initial explicit instruction of each word using student-friendly explanations.
  2. Meaningful activities, over a couple of days, to engage students in using the words in a variety of contexts.
  3. Assessments that gauge students’ depth of knowledge about the words.

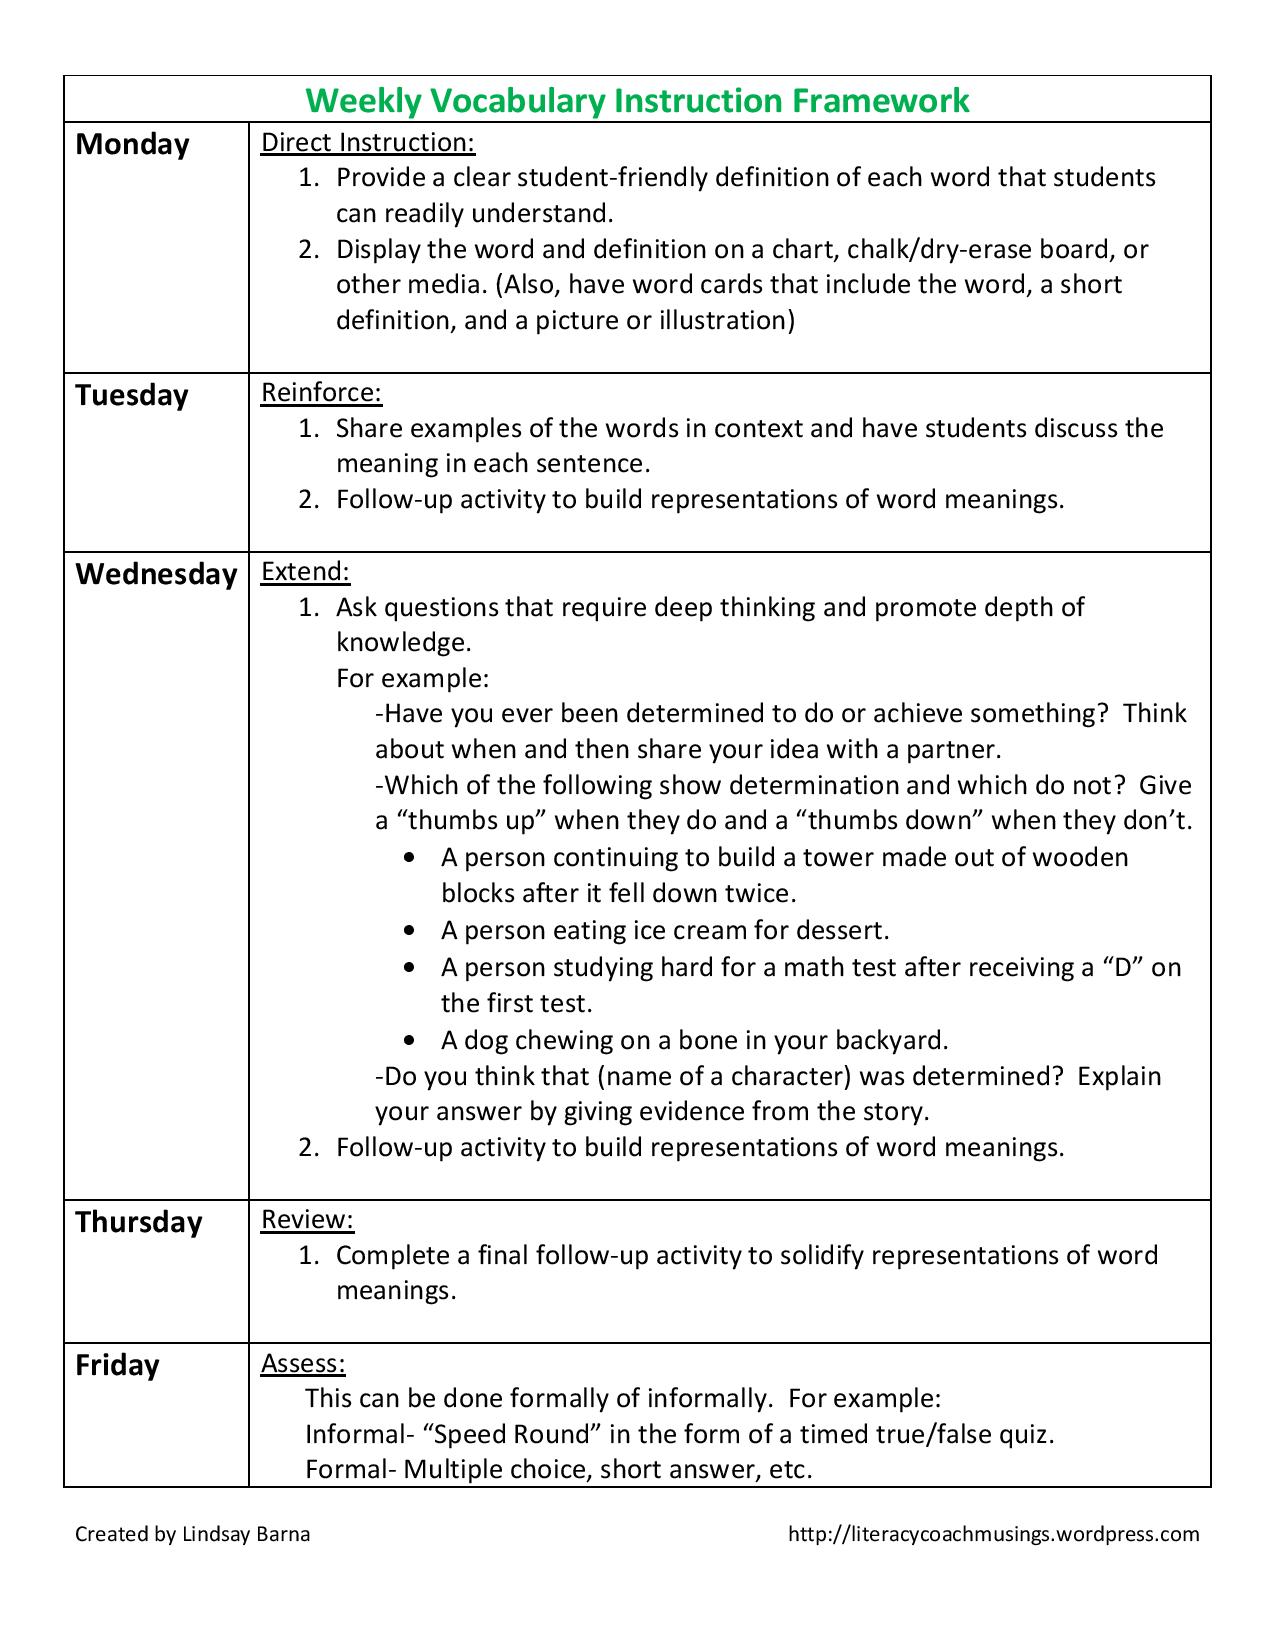
For example, my framework looks like this:

Weekly Vocabulary Instruction Framework

The idea is to spend 10-15 minutes per day to enhance vocabulary.  You will see that you and your students learn the predictable routines of the week and work through activities efficiently.  Again, sticking with a consistent framework will allow for quick delivery of instruction.

We can also not ignore the fact that teaching and learning vocabulary is a very complex process.

Effective vocabulary instruction requires a repertoire of teaching activities and instructional strategies coupled with the teacher’s ability to choose appropriately within this repertoire”

-Blachowicz, Fisher, and Ogle (2006)

 There is not a “one size fits all” approach to teaching words.  We should have a variety of different sources and strategies to pull from in order to meet our students’ needs.  Much akin to the work done during reading and writing workshop,  So to meet the needs of all learners, the follow-up activities mentioned in the above framework must be varied.

Possible Vocabulary Activities

  1. Example/Non-Example
    1. Present students with two situations.  Ask them which one exemplifies a given vocabulary word.
      1. For example:  Which would be an example of trepidation?
        1. Jumping into a swimming pool or hesitating before testing the water?
        2. Feeling confident about signing up for a contest or having uncertain feelings about signing up?
    2. Students need to explain their reasoning.
  2. Word Association
    1. Present students with situations that go with targeted words.
      1. For example: restrictions, awe, endured
        1. When I applied for a library card, I was surprised by all of the rules that I had to follow just to borrow a book.
        2. Walking into the dinosaur exhibit at the museum for the first time, I was amazed by the huge skeletons.
        3. When I read a biography of Ghandi, I marveled at all the trials that he had to face.
    2. Students need to explain their reasoning.
  3. Generating Situations, Contexts, and Examples
    1. Students create situations and contexts for given words.
      1. For example: dignity, prejudice, humiliation
        1. How might a losing team maintain its dignity?
        2. What is an example of someone acting with prejudice?
        3. How id Marian Anderson face the humiliation of not being able to stay in certain hotels?
  4. Word Relationships
    1. Students place vocabulary words on a continuum and explain their choices.
      1. For example:
        1. Positive: awe, dignity
        2. Negative: prejudice, humiliation
  5. Writing
    1. Students complete various sentence stems
      1. For example:
        1. There were many restrictions for using the gym because _____.
        2. The decorations for the graduation ceremony were awe-inspiring _____.
        3. He had an unwavering faith in his sister’s ability because _____.
  6. Vocabulary Pictionary
    1. Students choose a word from the word wall to illustrate.
    2. Classmates must identify the word from the illustration.
  7. Vocabulary Tic-Tac-Toe (or BINGO)
    1. Fill a 3 x 3 grid with vocabulary words.
    2. Students draw an X through the word when the definition is called out.
  8. Choose a Side
    1. Choose two words that have similar meanings.
    2. Say aloud a sentence where only one word fits.
    3. Students move to stand on one side of the room or the other to show which word they believe fits the sentence (or stand in the middle if they are unsure).

One last thought…

We need to make sure that our classrooms are energized, verbal environments.  We want words to not only be noticed, but also celebrated.  Make sure you room is print-rich and there is access to dictionaries and thesauruses.  Do everything you can to make sure students are curious about words and putting in the effort to discover words and how they work.

Let me know how you do as you implement explicit vocabulary instruction into your workshop.  What does your vocabulary instruction looks like already?  Do you have other vocabulary activities to add to my list?

Let’s keep the conversation going-

Lindsay

The Burning Vocabulary Question Series: Which words do I teach?

During the first part of this series, I outlined specific places where authentic vocabulary words could come from.  That list includes:

  1. Your current mentor texts
  2. Student’s independent reading novels
  3. Student’s writing

So, now, you’ve put systems into place and you’ve acquired a bunch of individual words to choose from for explicit vocabulary instruction.  You are most likely thrilled to have so many words at your fingertips!  However, when confronted with a long list of “good” vocabulary words, we know that it would be impossible to teach them all in an already packed school day.  We know that of all the possible words, we must select a small number of words for explicit instruction, but that can be frustrating.  Deciding which words to teach is challenging!  Similar to the lack of information regarding what words to teach discussed during the last post, the Common Core State Standards also do not say anything about how to identify the specific academic and domain-specific words to teach.

There are various types of words to consider for instruction:

  • words that are essential for comprehension of a specific text
  • words that are important for developing a broader reading and writing vocabulary (but are not directly linked to a specific text)
  • common words that students with a limited vocabulary are unlikely to know
  • words that represent themes in narratives or key concepts in informational texts (but are not included in the selection)
  • words with important structural features

Teachers are left wondering,

“Which words do I teach?”

Since we are working with words that have been authentically gathered from individual classroom sources, Beck and McKeown’s tier system would work best for selecting words for vocabulary instruction.  This system sorts words into three tiers or levels, as pictured below.

Created by Lindsay Barna literacycoachmusings.wordpress.com
Created by Lindsay Barna    literacycoachmusings.wordpress.com

Beck and McKeown recommend teaching Tier 2 words.  Unfortunately, there is not a magical list of Tier 2 words (sigh), nor do Tier 2 words have grade-level designations.  However, Linda Kucan’s article “What is Most Important to Know About Vocabulary?” (The Reading Teacher, Vol 65, Issue 6, 2012) gives guidelines for evaluating if words fall into the Tier 2 category.

Evaluation Criteria for Tier 2 Words

  • Students do not ordinarily use the word or hear the word in daily speech, but it is often encountered in books.
  • Students have knowledge or experience that would help them understand the word.
  • The word frequently appears in texts across a variety of content areas.
  • The word is useful or important for comprehending and writing about important ideas in a selection
  • The word can be worked with in a variety of ways (students can build rich representations of the word as well as connect it to other known words)

Here is a list of possible vocabulary words I pulled from Mrs. Mack by Patricia Polacco (guided reading level P).  Which word would you select for explicit instruction using the criteria outlined above?

Mrs Mack Vocabulary

I chose shabby, contours, coaxed, lurched, plunge, mount, yearned, and summoned. But remember, there is no “correct” answer.  Selecting one word over another is up to each teacher and which words s/he thinks will get the most bang for their buck within the individual classroom.  I chose these words because they will help students when they are reading and writing about ideas from the text and are words that are seen often in other texts. Many of these words can also be used in multiple contexts, so students will be able to construct high-level mental representations of each word. Some of the remaining words, especially those pertaining to horseback riding, are potential Tier 3 words.

I outlined how to do this selection process with a class mentor text.  We can use this same approach with words that have been spotlighted from student writing and suggested by students from their independent novels.

Now you have a clearer view of how to select vocabulary words, but you may still be plagued by one small nagging question,

“How many words should I choose?”

The total number of words to teach students weekly will depend on the actual students sitting in your classroom.  Your judgement and instructional goals will play a large part in the amount of words chosen.  Think about your students’ existing vocabularies and general language skills,  as well as the complexity of the average text experienced (by students during independent reading and through class readings).

A good target would be for students to learn about 500-600 words per school year.  Very roughly, that would translate to 12-15 words a week.  But fret not- this does not have to happen solely within your literacy block!  We can assume that students are learning words in other content areas besides literacy.  When learning about Landforms in  Social Studies, students will learn word such as plain and plateau, or in a math lesson, students might learn the word product or quotient.  So, it might be reasonable to say that in literacy, students should be explicitly taught 10 words a week.

I might pull 3 words from those suggested by students from their independent novels, 3 words spotlighted in student writing, and 4 from the current mentor text each week.

Once you’ve narrowed down your word selections, you are ready for the final step of the process- the actual instruction.  Best practices in vocabulary instruction will be the last installment in this series.  You’ll finally be able to put this behind-the-scenes work into action!

How many vocabulary words do you teach a week?  What words would you have chosen from my list from Mrs. Mack by Patricia Polacco?  Leave me a comment!

Let’s keep the conversation going-

Lindsay