Preparing for Book Clubs

I recently realized the best word to describe a workshop teacher’s behind-the-scenes work when addressing a group of parents at our district’s Literacy Night.  While explaining the principles of choice and independence in the workshop classroom, I wanted to emphasize to parents that this principle does not mean students are working without intention or direction.  A good workshop teacher (here’s my word!) ORCHESTRATES all that happens within the classroom.  S/he knows student reading levels and which books to push them toward, understands student’s struggles and how best to scaffold them,  and understands the social-emotional needs of the class and is ready to build those skills.  All without the student realizing just how “negotiated” their choice and independence really is.

As we roll into book clubs in our district, I’ve been thinking a lot about how prep work done ahead of time can really set us up for success.  The more ORCHESTRATING we do behind-the-scenes prior to clubs starting, the more they will run smoothly.

For the purposes of this post, I will focus on the management of book clubs– the routines and procedures teachers can put in place.

Scheduling

To begin, it’s helpful to have a schedule in place for when clubs are meeting to talk.  Clubs DO NOT need to talk long each day.  In fact, it might be best if clubs meet for discussion 2-3 times per week only.  These meetings should last somewhere from 8-10 minutes–middle schoolers will have a hard time sustaining purposeful talk any longer.  Plus, we want the focus of the day to be on their reading.  I am a strong proponent of protected reading time, and I don’t want club conversations to eat at that time.

Your week might look like this:

Book Club Schedule
On Longer talk days students bring post-its and ideas for sustained conversation.  On the Quick talk days students only check-in, reviewing pages to be read and reading lens or focus.

A set schedule allows for predictability, which allows students to work with more independence.  Because they are aware of the routines in place, they can better prepare for the work expected of them each day.

Group Planning

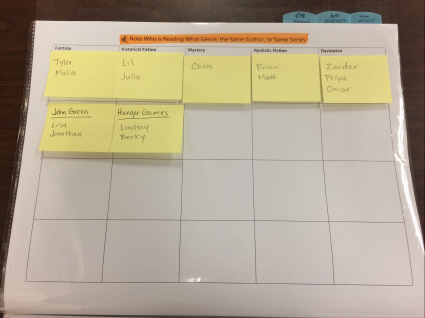
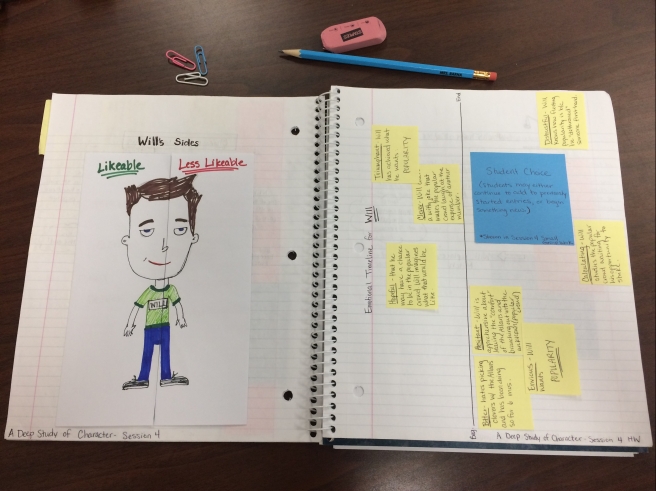
You can help students set-up and prepare for this schedule by providing them with reading/meeting calendars.  Here, students plan out the pages they will read each day as well as the thinking work that goes along with it.  They can determine their reading lenses and club conversation topics ahead of time.  Here is an example:

Book Club Calendar

This can then become a tool that you use to track student progress and keep groups accountable.  You can access an editable (!) copy of this calendar on my Resources page.

Accountability

If you are looking for a little bit more structure in how you track club conversations, another helpful tool is a Book Club Accountability Sheet.  This is a student completed account of their conversation and club behaviors (preparedness, focus, etc.) that is filled out each day.  It also helps students track/plan pages to be read and their next focus or lens.  For example,

Book Club Accountability Sheet

You can also access a copy of this Book Club Accountability Sheet on my Resources page.

Assessment

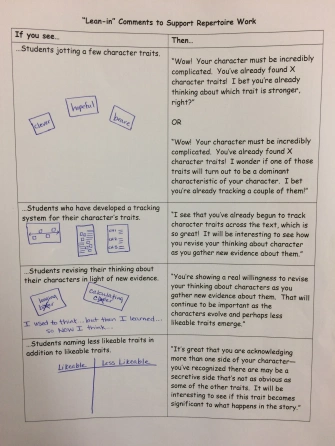
Finally, it’s helpful to know what you are on the look-out for in terms of student work and club talk  When assessing clubs, I like to look at five areas: preparedness, preparation, interpretation, evidence-based support, and collaboration.  On the rubric below, you can see my vision of what the ideal would be.

Book Club Rubric

As with all assessments, students should be aware of these criteria and standards.  You might expose them to your expectations via a mini-lesson and post an anchor chart outlining what book club members do.

book club members behavior chart

Another powerful tool is having students self-assess their book club behaviors.  This helps them set goals for improvement.  Here is a simplified version of the above rubric in the form of a self-assessment.

book club self assessmentI also capitalize on peers keeping each other accountable by using a group assessment, where group members assess each other’s behaviors.  If you’ve never done peer assessments, you might be surprised at how honest (sometimes brutally!) middle schoolers will be.  The combination of the Self-Assessment and the Group Assessment provides me with a clear picture of who is doing what in a book club.

Book Club Group Assessment

And yes–you guessed it!–these can also be found on my Resources page.  🙂


Stay tuned for my next post.  I plan to highlight how to support club’s structure and organization.

Let’s keep the conversation going-

Lindsay


Creating a Reading Unit Toolkit

My last post (which you can view here) detailed how I first familiarized myself with the Teachers College A Deep Study of Character middle school reading unit by Lucy Calkins and colleagues.  After creating my demonstration notebook, my mind began to drift toward a tool that teachers could use while conducting small groups and conferences.  Since all of the teaching session are so clearly laid out for teachers, I knew they needed minimal scaffolding and would easily be brought to life in the classroom.  Our district focus this year has been small groups and conferring, so  I wanted something that teachers could keep at their fingertips to make the teaching of the unit more clear during this segment of their workshop.

And so my A Deep Study of Character Toolkit was born!

toolkit feature image

I decided to do a separate kit for each bend.  This way the final product would not get too cumbersome.  Remember, I want to be able to walk around with this easily, while students are independently reading.  At the front of the kit I put a copy of the Bend I anchor chart, To Think Deeply About Characters…, as well as the anchor text, “Popularity” by Adam Bagdasarian.

Toolkit Anchor Text

For each session, I included the same three things:

  1. The anchor chart component
    • Provided with the unit.
  2. A strategy chart
    • These are charts that I’ve created based on the work of individual sessions.  Usually, they break the work taught in each minilesson into easy-to-follow steps.
  3. Any materials needed to teach the recommended small groups and/or conferences.

Here are images of the anchor component and strategy chart for session one and the small group and conferring materials for session two.


So, now that you have an understanding of what the toolkit entails, here is my process for making it…

Pulling Resources

Toolkit minichart

For some of your materials, you can access the unit’s online resources available through the Heinemann website.  These resources are included with the purchase of your unit book.  This is where I pulled the anchor chart, anchor text, and various other teaching charts included for each session (including mini-versions to hand out to students after a small group or conference- see image at right).


Creating Materials

Although some resources are provided in the online resources, I did make quite a few myself.  While the Units of Study are GREAT at providing the necessary resources to teach each individual session (or minilesson), the material for the suggested small group and conferring work is usually not included.  So, this is where I had to do a lot of creating.  Please note, that all of the content for my self-created materials was inspired or born directly from the A Deep Study of Character unit book.

Strategy Charts

To create the individual session strategy charts, I skim the lesson for a “how-to”.  Usually, at some point, it is suggested that you name out the steps you took during your demonstration.  This is your money-shot for finding components of a strategy chart!  Look for words like debrief, summarize, recap and review. Then read the scripted text that follows, and pull out the steps.  Last, let your inner Kate and Maggie Roberts (authors of DIY Literacy and former TC developers) go and get crafty!  This is my favorite part!

As an example, this (from Session 2)…

toolkit-chart-inspo-e1529415662103.jpg

…became this…

toolkit strategy chart

So fun!

Small Group and Conferring Materials

I use a similar process when creating the necessary resources for the suggested small group and conferring work.  I carefully read and think through each Conferring and Small-Group section of the session.  Often, the unit will name out specific small groups you could plan, like this example from Session 6:


I use the information in each section to develop and write a small group lesson plan; creating or pulling strategy charts, exemplars and resources as needed.


Sometimes, the unit suggests that you do some lean-in comments to support repertoire work.  Think of this as a way to guide students toward the work you are teaching as well as toward more sophisticated thinking.  Often the unit will provide some examples and Session One of the online resources has a print-out as well.  However, to make this resource teacher-friendly I put the suggested comments into an If/Then chart.

For session five I create the following,

toolkit comments if then

This chart includes all of the work done thus far in the unit from session one to four.  With a chart like this, teachers can use the visuals to easily see what type of student work to be on the lookout for, and what to say when they see it.

Logistics

All of the pages are housed in sheet protectors.  Single pages are organized back-to-back.  However, to keep organized I only put one small group lesson including materials in each plastic protector.  So when it is time to teach that lesson, you can easily pull out all the materials and go.


To make pages reusable year after year, I stuck Post-its to the outside of the sheet protectors.  This way teachers can jot observations down without having to reprint the page each year.  For example,

Toolkit Sheet Saver Postits

The blue tabs indicate each session of the bend.  I labeled each by number, but then also put one word to remind myself what the content of that session is. (I didn’t have the words at first, and although I’m getting pretty good at naming the content off-hand, I would sometimes be a session off.  With the goal of making this as simple and teacher-friendly as possible–why work harder than necessary?!)

Putting this together was really a rewarding task.  Like doing the demonstration notebook, this work helped to crystallize the concepts taught in the unit.  Time-consuming, yes.  But, well worth it- a labor of love!

What do you think?  Is this something you would find useful in your classroom?  What does your toolkit look like?

Let’s keep the conversation going-

Lindsay

Learning the Work Through a Demonstration Notebook

It’s no secret that my school district uses the Teachers College Reading and Writing Units of Study, so when the middle school reading units came out I was beyond stoked.  Navigating reading workshop at the middle school level has been difficult.  There are SO MANY resources out there (on the web, Pinterest, Twitter) for lower grades.  It was easy for me to conceptualize how to make the thinking work of lower elementary readers apparent to students, but I struggled with the higher-level analysis required of a middle schooler.  How exactly do we show readers how to synthesize information across a text or how to move beyond simply teaching identification of narrative elements and instead, showing how they interact and influence each other.

As the required thinking work gets harder, making what happens in my mind so naturally as a reader, is harder to break down into a step-by-step strategic manner.  BUT the new Middle School Reading  Units of Study put out by Lucy Calkins and colleagues (including the fabulous Emily Strang-Campbell) do just that!  They break down really complex thinking into simple easy to follow minilessons.  The work is not for the faint of heart… Students and teachers are asked to do a level of work that many may not be accustomed to, but the payoff is well worth it!

A Deep Study of Character


Needless to say, I am VERY excited!  So, when the Deep Study of Character unit got delivered to my door, I was so ready to dive right in and start figuring the unit out.


I began by scanning the lessons for two things:

  1. What am I teaching?
  2. What are the students doing?

In This Session

I used to do this work by first reading the Teaching Point (to see what I am doing) and then reading the Link (to see what students are to do).  HOWEVER, unlike any of the other grade-level units, the middle school units have a spectacular “In This Session” feature, that clearly states that information at the start of the session.  So smart!

To wrap my head around the work of Bend I, I first created a Demo Reading Notebook using the anchor text “Popularity” by Adam Bagdasarian.  This was really helpful.  By pushing myself to do the work expected of students, the teaching of each session became more clear.

Deep Study Notebook Cover

Here are some more pages from my notebook. 🙂


There is a page of thinking work for each session of Bend I as well as a homework page.

notebook-spread.jpg

Usually suggested homework is to read (obviously) and do some thinking work.  Students may either return to work started in class or begin something new.  Just for demonstration purposes (for the teachers I work with and for students), I created a new entry type for each day of homework.  I chose a variety of different styles so that an assortment of entries were exemplified.

A couple of new ideas I’ve had about notebooks after this process:

  • When assessing them (because unfortunately yes, we are a slave to grades at times), I would expect to see some evidence of the work taught each minilesson.  It may not be great or mastered, but students should be making an attempt to approximate the thinking work taught.  So, in terms of the Deep Study of Character unit, in Bend I I would expect to see evidence of students naming character traits, tracking traits and revising their initial ideas about characters, identifying likeable and unlikeable sides in characters, weighing and ranking traits based on their dominance or tendency to affect the plot, and analyzing the pressures characters experience.  In addition, I might see students doing one or two pages of “other” work.  Something they thought of on their own or were shown during a small group or conference.
  • REMEMBER notebook pages are often Thinking, Return-to Pages.  A fully completed notebook exemplar is NOT created in one sitting.  It may be developed over the course of a couple days as students progress through their book.  It is constantly being added two as student learn more about their character, revise their ideas, include new evidence, etc.  Imagine an Emotional Timeline- students would begin it at the start of a book with some initial ideas about the character’s state of mind and add to it as they proceed through the events of the novel.
  • With this idea in mind, the logistics of when notebook pages are created was clarified.  I always understood that they had to be done, but the question was WHEN?  If students are expected to spend the majority of their time reading, when do these marvelous notebook entries happen?  However, once I realized that notebook entries are returned to, it became more apparent.  Students should be spending a couple of minutes each day (and night for homework) adding to their notebook entries.

How have you acclimated yourself to this new unit??  Please share!!!!

Let’s keep the conversation going-

Lindsay

Fostering Student Independence and Accountability

After my last post, some questions came up about how to foster the sort of independence that made Mrs. G’s classroom work like a well oiled machine.  A big part of the answer is teacher talking moves!

So much of our daily classroom life is spent engaged in talk.  The importance of student talk is immeasurable, and in order to talk well students must be given many opportunities to converse and become immersed in an environment that values their voice.  An entire blog post could be devoted to the importance of fostering student talk, but I want to focus on how teacher talk can cultivate student independence and accountability in the workshop classroom.

Teacher talk is what sets the classroom tone.  The talking moves that we make day-to-day make a profound impact on students.  How many of you have come to the end of a school year and noticed that your students sound just like you?  The behaviors, attitudes, and habits we model will be emulated by our students, which is why it is so important that we use our talk effectively.

Talk to Foster Independence

As mentioned in my previous post, a main belief backing the workshop model is that we are working to create independent readers and writers who have a repertoire of effective reading and writing strategies they can apply as needed.  Workshop teachers do this by using whole-class mini-lessons to add to students’ repertoire, teaching them how to use various strategies they can draw on over and over.  This approach differs from traditional classrooms, where teachers use instruction at the start of the lesson to model and teach what everyone is expected to do during independent work time that day.  Basically, in a workshop classroom, you should not assign a task for students to  complete that day!

The language we use to dismiss students to work time will encourage the idea that students have options and choice about their day’s work.  Some phrases you might say include:

  • “So let’s review your options for what work you’ll do today.” *Refer students to unit anchor chart.
  • “So when you’re ready to work on [insert the day’s mini-lesson topic] remember this tip…  But you can also draw on all you’ve learned to do, prior to now.”
  • “So we can now add [insert the day’s mini-lesson topic] to our Strategies of…. anchor chart.  Look over the chart, and make a plan for today.  What will you be working on?” *Students could turn and talk, telling a partner their plan for the day.
  • “So far we’ve learned readers/writers use many different strategies to [name out skill].  Which one will you work on today?” *Students could raise their hand in a quick informal poll.
  • “So when you reach that part of your text, remember that you can…” *This is good when you know that you have students who have not reached the particular point in a book for the strategy you’ve just modeled.
A sample unit anchor chart from a third grade mystery book club series.

All of these talking moves will allow students to reflect on their progress, set goals, and make an action plan.  These actions are the exact behaviors we expect from independent, self-directed learners!

Talk to Foster Work Accountability

We can also use our talk to promote accountability in student work.  Sometimes there are days when a student may not have approximated any of the strategies that you have modeled.  You would like to give students an opportunity to turn and talk about that work, but you worry that that particular student will not have anything to contribute.

I saw this situation recently in a third-grade classroom.  Students were working on tracking characters along a story mountain.  Some students had drawn their mountain, but had not added any plot points.  The teacher kept them accountable by saying,

“Even if you haven’t drawn any plot points, point and say what your points would have been.”

We  can use talk as a means for students to practice strategies they have not exhibited “on paper”.  No one gets an out because they didn’t get to it.

Talk to Foster Accountable Talk

We’ve all seen the Accountable Talk posters on Pinterest and have really taken to them.  However, students cannot learn these talking moves from a poster on the wall.  We as teachers need to model these talking moves regularly when conversing with students.  Some common conversational moves and their purposes are:

  • Marking: “That was an important point.”
  • Challenging students: “What do you think?”
  • Keeping everyone together: “Who can repeat what Johnny just said?”
  • Keeping the channels open: “Did everyone hear that?”
  • Linking contributions: “Who wants to add on to Mikala’s point?
  • Verifying and clarifying: “So are you saying…”
  • Pressing for accuracy: “Where can we find proof/text evidence of that?”
  • Expanding reasoning: “Take your time, say more.”
  • Pressing for reasoning: “Why do you think that?”
  • Building on prior knowledge: “How does this connect?”

Nancy Frey, at a recent Rutgers University workshop, said that we need to immerse students into these talking patterns by using them as often as possible.  When this language becomes a way of life for us, it will soon become a way of life for students.

The sooner we make our talk align with our goals for students, the sooner a positive outcome will ensue.  We have to make sure that what we are saying to kids truly embodies our beliefs about teaching and learning.  What we say in the workshop classroom is just as important as what we do.

What kind of talking moves do you make in your classroom to foster independence and accountability?

Let’s keep the conversation going-

Lindsay

If You Build It They Will Come

I believe in the workshop model.  Wholeheartedly.  I know that it is what works best for kids.

But honestly, when I implemented the model, I had a bit of skepticism regarding one aspect.  I never quite understood (or believed?) how young learners could learn a repertoire of reading and/or writing strategies and then just “magically” recall and apply them “independently” during the work period.  Early in my workshop teaching, I questioned, “Wait.  No task?  No assignment?  No specific instructions to go back and try (insert mini-lesson strategy here)?”

I was curious how the youngest learners could be so self-directed and purposeful during independent time.  Like most people, I was afraid to let go.

Now, I see many of the teachers that I work with grappling with the same concern.  However, like a field of dreams, if you build it they will come.

I recently visited a third grade classroom where magic was happening!  The class was in the middle of a mystery book club unit and after the mini-lesson students were sent back to their desk with their “quiet critters” (small craft pom-poms outfitted with feet and eyes) to read.

Immediately, I was impressed with how quickly the students transitioned from the carpet to independent reading.  Two students (who were in differing book clubs-I noticed because they had different books) sat together at the carpet and created twin Venn-diagrams in their notebooks to start character comparisons for the characters they were reading about. Another two met the teacher at her table for a quick small group.  Everyone else?  They returned to their seat, opened their notebooks to the next fresh page, and started reading.

Needless to say, I was impressed and I wanted to stick around.

I started to read over students’ shoulders as they paused (when they decided they were ready) in their reading to do some stop and jot reading notebook work.  What I saw was so impressive!  Students were independently choosing various reading responses to use in their notebook.  Most surprising to me was that students weren’t just jotting once.  The majority of students had chosen to do at least two different types of thinking that day.   For example, some predicted and then chose to do a character comparison.  Others created a suspect chart and wrote about character traits.  But all were reading…. and thinking!

This teacher, through meticulous patience and belief in the workshop model had created what we all strive for.  Her routines and expectations were working!

Look at this example from one student’s notebook:

Starting in the middle of the left page, this student did six separate thinking strategies (all dated 2/24/16). She wrote about book similarities, created a comparison Venn diagram, described a secondary character, named out how a character changed, summarized, and created a character web and attempted to include text evidence.

When I spoke with this student she told me that writing in her notebook helps her reading “go from good to great.”  That sometimes she doesn’t understand something, but then she will write about it and it would become much clearer.  She explained that she chooses what to do based on what Mrs. G has shown them before.  There is no menu of activities to choose from pasted into each reading notebook or listed posted on the board of what to do next.  Strategies had been instilled into each learner in the class and they were drawing upon that knowledge independently.

I moved over to another student who was sitting next to Mrs. G’s anchor chart, and from what it looked like, copying the chart into her notebook.  I asked what she was working on.  She gestured to the chart and told me that she was taking questions from the chart and answering them in her notebook.  And she was!  I remembered that she was one of the ones who had started a Venn diagram  earlier and I wondered if she had abandoned that task for this one.  I asked her about the Venn diagram.  She flipped back a page and said, “That’s right here.  I didn’t finish yet.”  And then after a moments pause, “But I guess I can use the answers to these questions…” She flipped back to the answers based off the anchor chart questions,  “…to finish filling in my chart.”  She returned to her Venn diagram with urgency and fervor.  I hadn’t even said a word.

After I picked my jaw up off the floor, I immediately went to commend Mrs. G.  She was making it happen! Her kids were readers and independent thinkers and doing all the things we want students to do in the workshop model!   I was so excited!

But Mrs. G was busy… quietly conferring with a student.

So, I tiptoed out with a smile on my face and let them continue doing their thing.  I felt assured in the good work that we do and the value of the workshop model.  It IS possible!  She had built it and they had come.

Let’s keep the conversation going-

Lindsay