Learning the Work Through a Demonstration Notebook

It’s no secret that my school district uses the Teachers College Reading and Writing Units of Study, so when the middle school reading units came out I was beyond stoked.  Navigating reading workshop at the middle school level has been difficult.  There are SO MANY resources out there (on the web, Pinterest, Twitter) for lower grades.  It was easy for me to conceptualize how to make the thinking work of lower elementary readers apparent to students, but I struggled with the higher-level analysis required of a middle schooler.  How exactly do we show readers how to synthesize information across a text or how to move beyond simply teaching identification of narrative elements and instead, showing how they interact and influence each other.

As the required thinking work gets harder, making what happens in my mind so naturally as a reader, is harder to break down into a step-by-step strategic manner.  BUT the new Middle School Reading  Units of Study put out by Lucy Calkins and colleagues (including the fabulous Emily Strang-Campbell) do just that!  They break down really complex thinking into simple easy to follow minilessons.  The work is not for the faint of heart… Students and teachers are asked to do a level of work that many may not be accustomed to, but the payoff is well worth it!

A Deep Study of Character


Needless to say, I am VERY excited!  So, when the Deep Study of Character unit got delivered to my door, I was so ready to dive right in and start figuring the unit out.


I began by scanning the lessons for two things:

  1. What am I teaching?
  2. What are the students doing?

In This Session

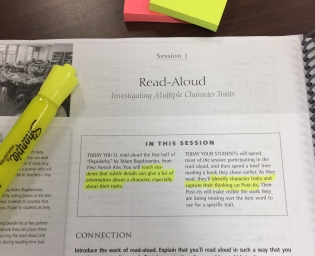
I used to do this work by first reading the Teaching Point (to see what I am doing) and then reading the Link (to see what students are to do).  HOWEVER, unlike any of the other grade-level units, the middle school units have a spectacular “In This Session” feature, that clearly states that information at the start of the session.  So smart!

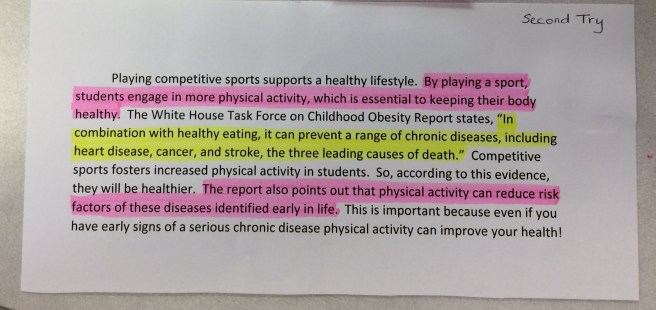
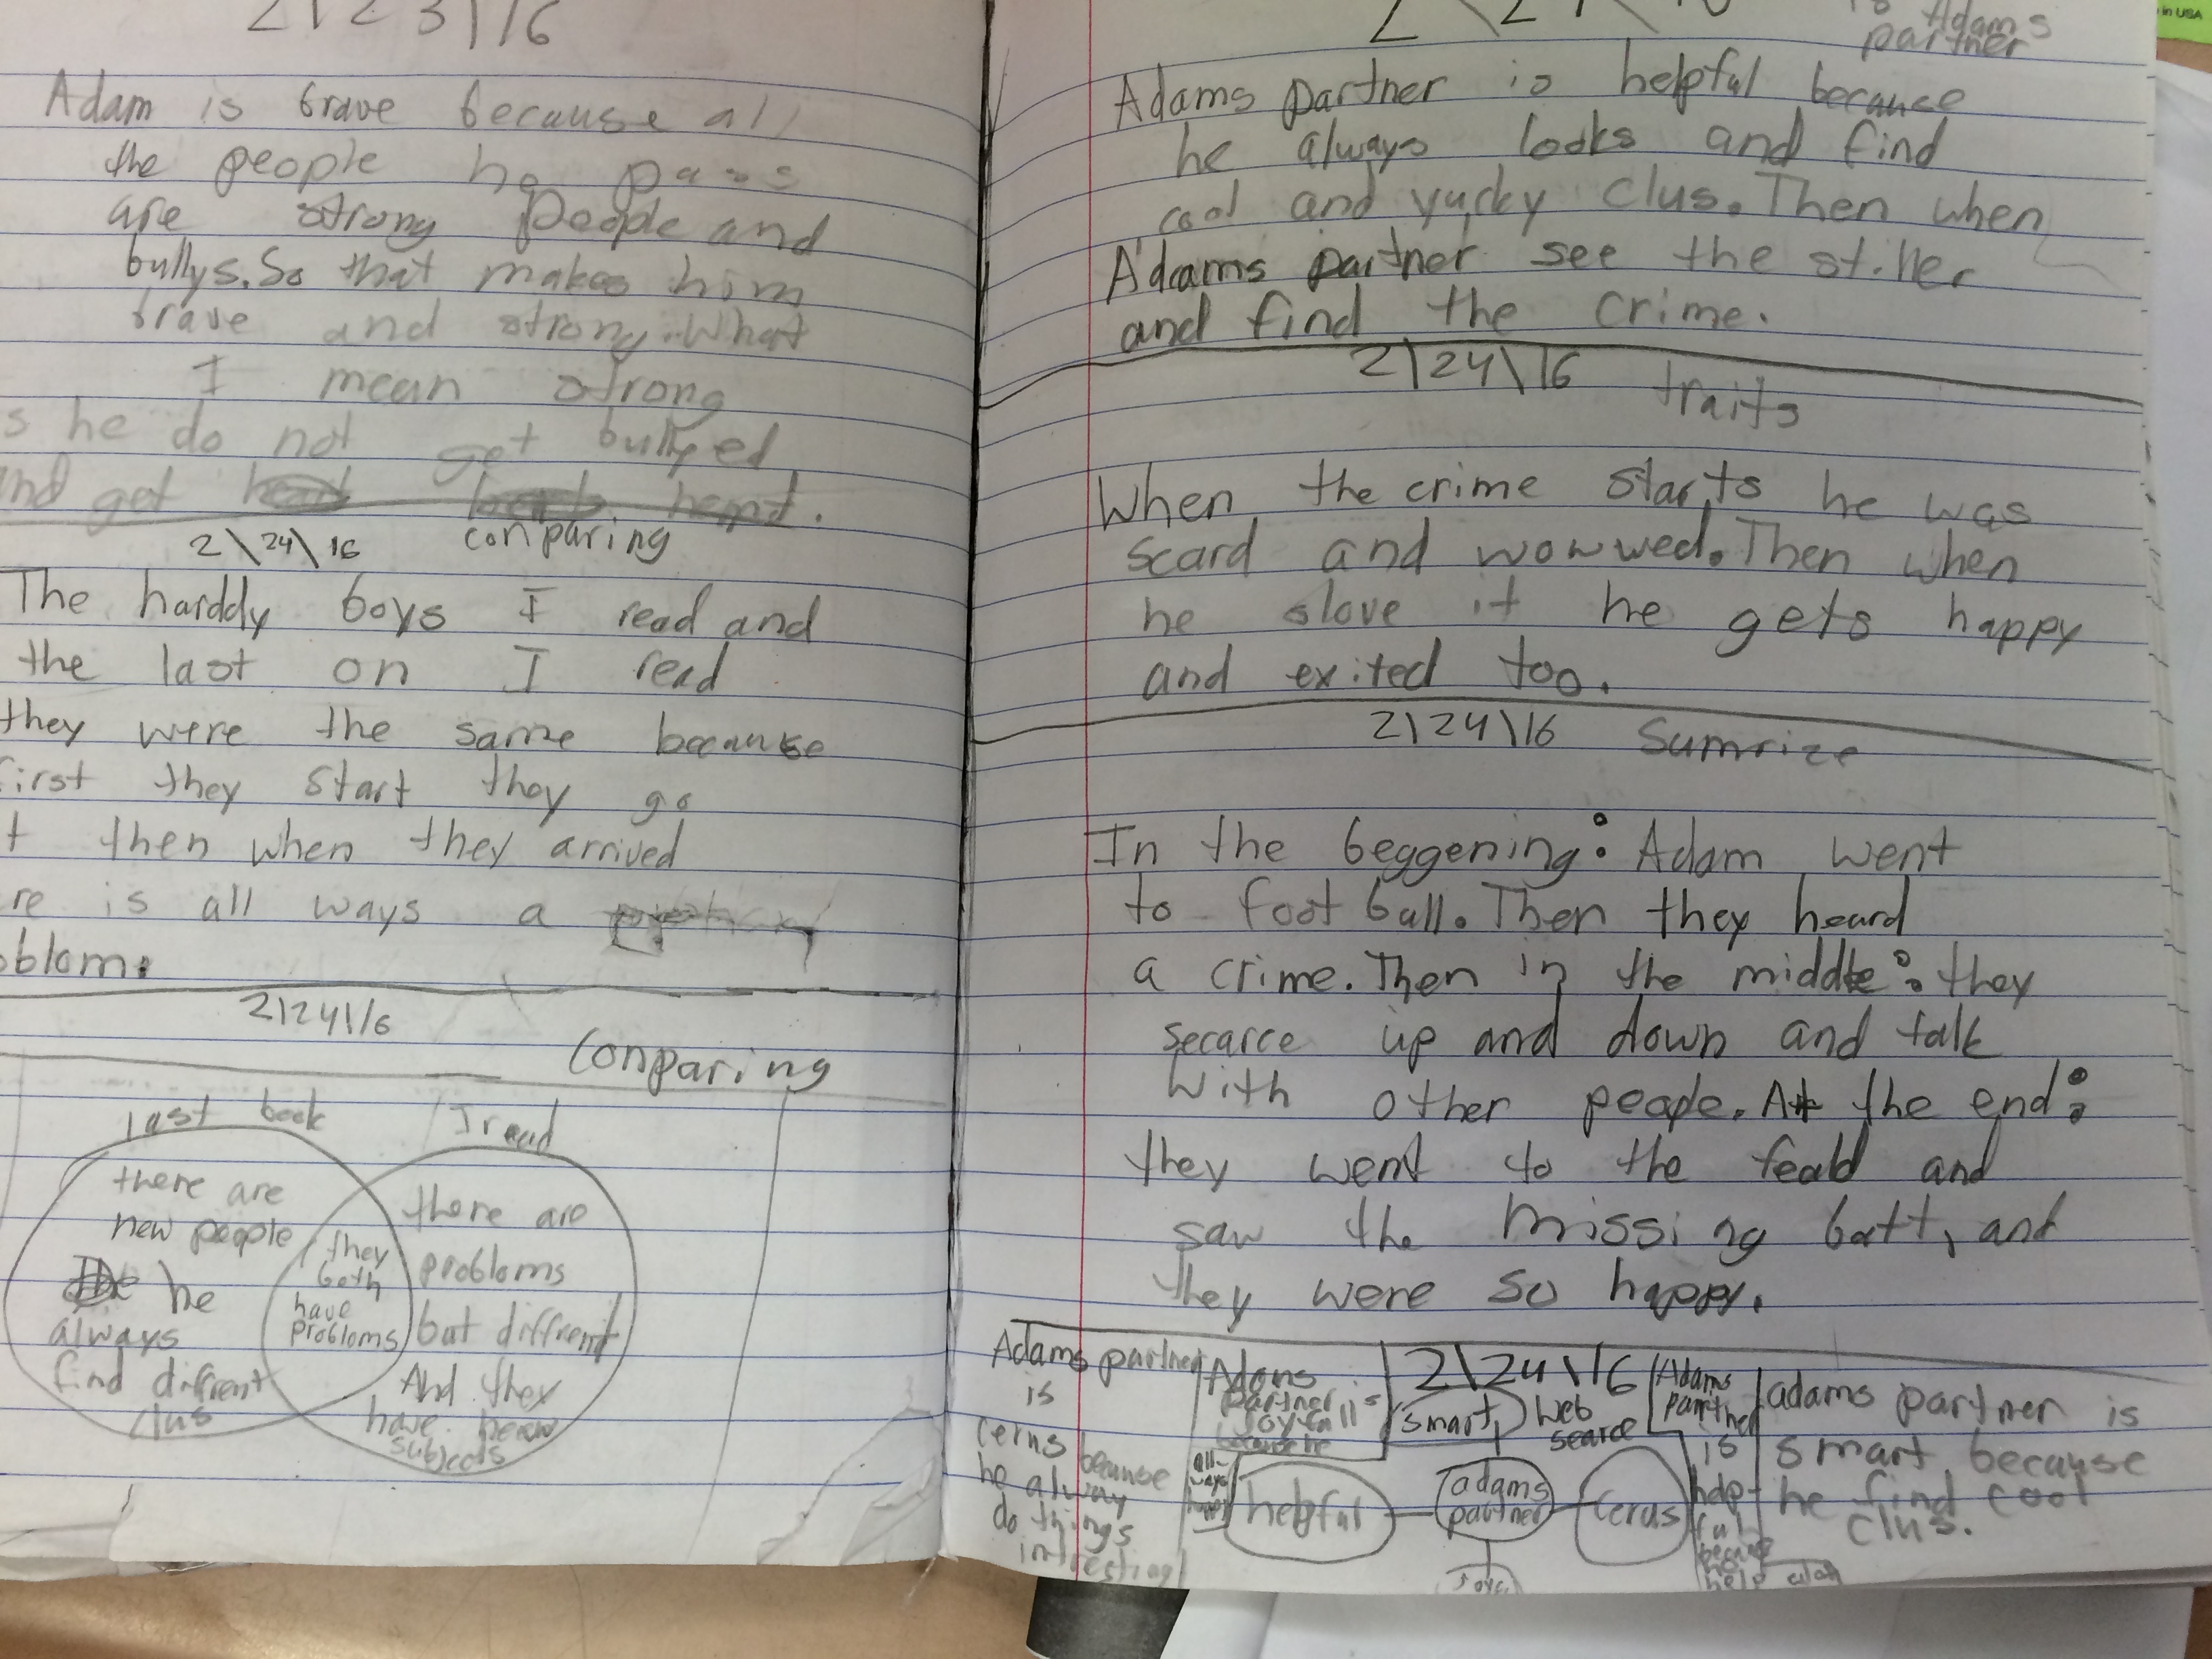
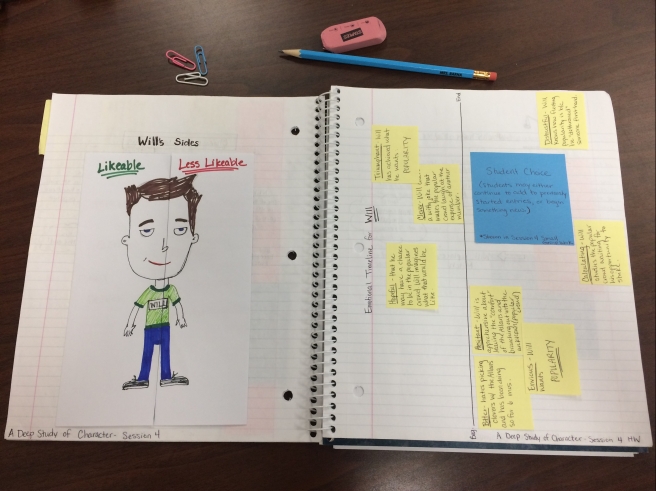
To wrap my head around the work of Bend I, I first created a Demo Reading Notebook using the anchor text “Popularity” by Adam Bagdasarian.  This was really helpful.  By pushing myself to do the work expected of students, the teaching of each session became more clear.

Deep Study Notebook Cover

Here are some more pages from my notebook. 🙂


There is a page of thinking work for each session of Bend I as well as a homework page.

notebook-spread.jpg

Usually suggested homework is to read (obviously) and do some thinking work.  Students may either return to work started in class or begin something new.  Just for demonstration purposes (for the teachers I work with and for students), I created a new entry type for each day of homework.  I chose a variety of different styles so that an assortment of entries were exemplified.

A couple of new ideas I’ve had about notebooks after this process:

  • When assessing them (because unfortunately yes, we are a slave to grades at times), I would expect to see some evidence of the work taught each minilesson.  It may not be great or mastered, but students should be making an attempt to approximate the thinking work taught.  So, in terms of the Deep Study of Character unit, in Bend I I would expect to see evidence of students naming character traits, tracking traits and revising their initial ideas about characters, identifying likeable and unlikeable sides in characters, weighing and ranking traits based on their dominance or tendency to affect the plot, and analyzing the pressures characters experience.  In addition, I might see students doing one or two pages of “other” work.  Something they thought of on their own or were shown during a small group or conference.
  • REMEMBER notebook pages are often Thinking, Return-to Pages.  A fully completed notebook exemplar is NOT created in one sitting.  It may be developed over the course of a couple days as students progress through their book.  It is constantly being added two as student learn more about their character, revise their ideas, include new evidence, etc.  Imagine an Emotional Timeline- students would begin it at the start of a book with some initial ideas about the character’s state of mind and add to it as they proceed through the events of the novel.
  • With this idea in mind, the logistics of when notebook pages are created was clarified.  I always understood that they had to be done, but the question was WHEN?  If students are expected to spend the majority of their time reading, when do these marvelous notebook entries happen?  However, once I realized that notebook entries are returned to, it became more apparent.  Students should be spending a couple of minutes each day (and night for homework) adding to their notebook entries.

How have you acclimated yourself to this new unit??  Please share!!!!

Let’s keep the conversation going-

Lindsay

Argument Writing Toolkit- Transitioning In and Out of Quotes (Set-up)

This strategy was created to address a common gripe that many of the teachers I work with have.  The struggle is that students just plop quotes into the middle of their writing without any precursor or explanation to its relevance.  These students lack the skill of how to transition into and/or out of quotes.  In student-friendly language, we call this setting up and unpacking a quote.

IMG_5713

When addressing this struggle, I would only  attend to one or the other- never both at the same time.  My reasoning is that I do not want to overwhelm the students.  I’d prefer they  focus on one strategy fully rather than trying to split their attention.  If students need to work on BOTH, I always begin with setting-up quotes.  Why?  Because it’s easier to attain.  This is due to the fact that all students need to do to be successful in this skill is to add in a simple transitional phrase.

So, let’s start with how to set-up a quote (how to unpack a quote will follow).  A sample teaching point to introduce how to transition into quotes might look like this:

Teaching Point- Transition into Quotes- Set Up Quote

Begin your small group by showing a piece of your writing where you are having this struggle.

First Try

Point out to students the way the quotes are just dropped into the text without giving the reader any warning.  Explain how this seems blunt or even confusing.

Next, share with students a simple chart that provides some examples of transitional phrases they can use to set-up quotes.

IMG_5715

You might want to modify this chart for varying levels of students.  For example, special education students may be overwhelmed by too many options, so a shorter list would be appropriate.  Or, include sophisticated language for those students that need a little push.  After reviewing released student samples from our state test (we are a PARCC state), there was a notable score difference for  students who used more academic transitions (“In addition ___, states…”) compared to more basic versions (“Also ___, says…”).   So, you might want to build students up in that way.

Also, think about the power of using the same  transitions all year long (in literary essay,  argument, and information writing).  Recently, I discussed with Emily Strang-Campbell, a fantastic staff developer from TCRWP (as well as a friend and mentor of mine), how having a set list of 5-8 transitions might actually help students internalize them easier and transfer their use when it comes to state test time.  Often, our inclination as teachers is to give them an all-inclusive list of every possible transitions imaginable.  Our thinking might be that our chances of a student using a transition increases if we provide them with more options. The more the merrier, right?  However, by focusing in on a few very powerful transitions, that are ALWAYS used, students might remember them easier.

Another piece of advice is to hang this anchor chart in the same place all year.  Come test time–yes, you take all your instructional materials down– but if students are taking the test in your room they  may be visually reminded of the transitions because of where that chart used to be.

Getting back to the small group lesson, model incorporating transitions to set-up quotes in your demo piece.  Think aloud how you determine which to use.  Show how your piece looks with changes in place.

Second Try

Finish off your group by allowing students to try this work right in front of you as you coach into their progress.

Up next- Unpacking Quotes.  Check back soon!

Let’s keep the conversation going-

Lindsay

Argument Writing Toolkit- Trimming Block Quotes (Ellipses)

My last post outlined one strategy to help students trim long block quotes from their writing pieces (see that post here), and this post will show another.  Remember these strategies are for students who struggle with cutting down a long quote because they feel that their reader needs all the information in the quote.  Therefore, the strategy of omitting unimportant parts from the quote (which you can see here) is not useful for this crop of writers.

I’ll begin by sharing the teaching tool I use to teach this strategy, and then I’ll follow up with a few words of caution about using ellipses.

My teaching point for this work is pretty straightforward:


Teaching Point-Trimming Down Quotes- Elipses

The orange sticky flags alongside the teaching point are ellipses I use when modeling.  Students can also use them during the small group to make the lesson a bit more tactile.

Like my previously shared strategies, I start by showing a sample of my own writing that personifies the problem these students have– too much quoted text within a paragraph.  However, I empathize with them about how important I think the quote is and how difficult it would be to cut any part of it because it ALL seems so important.

IMG_5698

I explain to the students my thinking–how in this example, using ellipses would be the best strategy to use as opposed to paraphrasing because of the way the quote is comprised of a long list.  When reading this quote, my audience can easily get bogged down and lost in the list.  As a writer, I made the decision that although all the details are important, my audience will get the gist of what I mean if only a few are listed.

Next, I talk through my thinking of which part of the quote I would omit and replace with ellipses.  I model how to strike out that section and then I replace it with an ellipses sticky.  This way students can visually see the editing moves being made.  I, then, followed that up with a clean version incorporating the change.

Teaching Tools- Trimming Down Quotes- Elipses

Notice how the proportion of quoted text to my own writing is improved with the use of ellipses.  In my first try, the quote takes up about one third of my paragraph!  That’s not enough of my voice.  My second try, however, has a much better balance.

As always, this small group is rounded out with a time for students to try this work in their writing pieces with me coaching in.  I usually let them work for a few minutes, while I scan or walk the room, then check back in.

A word of caution about using ellipses.  You have to warn your students that ellipses, when used incorrectly, can alter the meaning of the quoted text.  So as writers, they need to stay true to the author’s original intent or emphasis.  For example, look at this example of an original quote (highlighted in yellow) and use of ellipses (on the pink sticky):

Teaching Tools- Trimming Down Quotes- Elipses Extension

Notice how the writer misused the quotation.  By eliminating the beginning and end portion, the meaning of the entire quote is skewed.  The quote is actually pointing out how non-concussed players had impaired brain functioning, but it can easily be manipulated to seem like it is showing how concussions lead to impaired brain functioning.

It is important that we warn students of this when we are teaching the use of ellipses for trimming down block quotes.  I usually have students ask themselves a question to make sure that they are staying true to the original intent of the quote:

Does this keep the essence of what the author was trying to say, or does it change it?

Try this strategy out!  Let me know how it goes!

There are only two strategies left.  Follow to see the rest!

Let’s keep the conversation going-

Lindsay

Argument Writing Toolkit- Trimming Block Quotes (Paraphrase)

Hello!  Happy New Year!

I hope that everyone had a happy and healthy holiday season.  It sure was a busy one!  I promised to post after the holidays and had every intention of getting back to you last week.  However, as you may know the East Coast was hit with a “bomb cyclone” and my school district had TWO snow days on Thursday and Friday.  So…in the past 16 days I’ve  only had one work day. Wow!

But let’s get back to it!

Today I’d like to share another tool for helping students add evidence to their argument pieces.  This strategy is for students who have included block quotes that are too large in their writing.  Remember, a good rule of thumb is that quoted text should only take up about 5-10% of the writing.  The difference with this cohort of students is that they  feel like they can’t cut the block quote because the information is important for the reader to know.  So, these writers cannot use the previously shared Allow Your Writing to Shine strategy, of striking to omit parts of quote that are deemed unimportant.

To solve this problem, students can choose to either paraphrase parts of the quote or use ellipses.  Today’s post will highlight how I teach students to paraphrase their quote (how to use ellipses will follow).

0001 (2)

I began this small group with the teaching point pictured below and by showing students a piece of my writing that had an overly large portion of quoted text:

Teaching Point-Trimming Down Quotes- Paraphrase

IMG_5687

Then, I demonstrated how I chose parts of the quote to paraphrase.  I modeled how to strike out the chosen sentences and then rewrite them in my own words.

Teaching Tools- Trimming Down Quotes- Paraphrase

Next,  I shared a revised version of my original writing that incorporated the paraphrased sections of the quote.  I pointed out how my entire paragraph had to be reworked a bit as opposed to just plugging in the paraphrased sentences.

Teaching Tools- Trimming Down Quotes- Paraphrase

Finally, as always, I finished this group by letting students have a go.  Each worked right in front of me on trying this strategy as I coached in and addressed any individual needs.

There you have it! Have your tried any of the strategies I’ve shared with your kiddos?  How did it go?

Let’s keep the conversation going-

Lindsay

P.S. Like what you see? More tools to come- Follow along!

Fostering Student Independence and Accountability

After my last post, some questions came up about how to foster the sort of independence that made Mrs. G’s classroom work like a well oiled machine.  A big part of the answer is teacher talking moves!

So much of our daily classroom life is spent engaged in talk.  The importance of student talk is immeasurable, and in order to talk well students must be given many opportunities to converse and become immersed in an environment that values their voice.  An entire blog post could be devoted to the importance of fostering student talk, but I want to focus on how teacher talk can cultivate student independence and accountability in the workshop classroom.

Teacher talk is what sets the classroom tone.  The talking moves that we make day-to-day make a profound impact on students.  How many of you have come to the end of a school year and noticed that your students sound just like you?  The behaviors, attitudes, and habits we model will be emulated by our students, which is why it is so important that we use our talk effectively.

Talk to Foster Independence

As mentioned in my previous post, a main belief backing the workshop model is that we are working to create independent readers and writers who have a repertoire of effective reading and writing strategies they can apply as needed.  Workshop teachers do this by using whole-class mini-lessons to add to students’ repertoire, teaching them how to use various strategies they can draw on over and over.  This approach differs from traditional classrooms, where teachers use instruction at the start of the lesson to model and teach what everyone is expected to do during independent work time that day.  Basically, in a workshop classroom, you should not assign a task for students to  complete that day!

The language we use to dismiss students to work time will encourage the idea that students have options and choice about their day’s work.  Some phrases you might say include:

  • “So let’s review your options for what work you’ll do today.” *Refer students to unit anchor chart.
  • “So when you’re ready to work on [insert the day’s mini-lesson topic] remember this tip…  But you can also draw on all you’ve learned to do, prior to now.”
  • “So we can now add [insert the day’s mini-lesson topic] to our Strategies of…. anchor chart.  Look over the chart, and make a plan for today.  What will you be working on?” *Students could turn and talk, telling a partner their plan for the day.
  • “So far we’ve learned readers/writers use many different strategies to [name out skill].  Which one will you work on today?” *Students could raise their hand in a quick informal poll.
  • “So when you reach that part of your text, remember that you can…” *This is good when you know that you have students who have not reached the particular point in a book for the strategy you’ve just modeled.
A sample unit anchor chart from a third grade mystery book club series.

All of these talking moves will allow students to reflect on their progress, set goals, and make an action plan.  These actions are the exact behaviors we expect from independent, self-directed learners!

Talk to Foster Work Accountability

We can also use our talk to promote accountability in student work.  Sometimes there are days when a student may not have approximated any of the strategies that you have modeled.  You would like to give students an opportunity to turn and talk about that work, but you worry that that particular student will not have anything to contribute.

I saw this situation recently in a third-grade classroom.  Students were working on tracking characters along a story mountain.  Some students had drawn their mountain, but had not added any plot points.  The teacher kept them accountable by saying,

“Even if you haven’t drawn any plot points, point and say what your points would have been.”

We  can use talk as a means for students to practice strategies they have not exhibited “on paper”.  No one gets an out because they didn’t get to it.

Talk to Foster Accountable Talk

We’ve all seen the Accountable Talk posters on Pinterest and have really taken to them.  However, students cannot learn these talking moves from a poster on the wall.  We as teachers need to model these talking moves regularly when conversing with students.  Some common conversational moves and their purposes are:

  • Marking: “That was an important point.”
  • Challenging students: “What do you think?”
  • Keeping everyone together: “Who can repeat what Johnny just said?”
  • Keeping the channels open: “Did everyone hear that?”
  • Linking contributions: “Who wants to add on to Mikala’s point?
  • Verifying and clarifying: “So are you saying…”
  • Pressing for accuracy: “Where can we find proof/text evidence of that?”
  • Expanding reasoning: “Take your time, say more.”
  • Pressing for reasoning: “Why do you think that?”
  • Building on prior knowledge: “How does this connect?”

Nancy Frey, at a recent Rutgers University workshop, said that we need to immerse students into these talking patterns by using them as often as possible.  When this language becomes a way of life for us, it will soon become a way of life for students.

The sooner we make our talk align with our goals for students, the sooner a positive outcome will ensue.  We have to make sure that what we are saying to kids truly embodies our beliefs about teaching and learning.  What we say in the workshop classroom is just as important as what we do.

What kind of talking moves do you make in your classroom to foster independence and accountability?

Let’s keep the conversation going-

Lindsay

If You Build It They Will Come

I believe in the workshop model.  Wholeheartedly.  I know that it is what works best for kids.

But honestly, when I implemented the model, I had a bit of skepticism regarding one aspect.  I never quite understood (or believed?) how young learners could learn a repertoire of reading and/or writing strategies and then just “magically” recall and apply them “independently” during the work period.  Early in my workshop teaching, I questioned, “Wait.  No task?  No assignment?  No specific instructions to go back and try (insert mini-lesson strategy here)?”

I was curious how the youngest learners could be so self-directed and purposeful during independent time.  Like most people, I was afraid to let go.

Now, I see many of the teachers that I work with grappling with the same concern.  However, like a field of dreams, if you build it they will come.

I recently visited a third grade classroom where magic was happening!  The class was in the middle of a mystery book club unit and after the mini-lesson students were sent back to their desk with their “quiet critters” (small craft pom-poms outfitted with feet and eyes) to read.

Immediately, I was impressed with how quickly the students transitioned from the carpet to independent reading.  Two students (who were in differing book clubs-I noticed because they had different books) sat together at the carpet and created twin Venn-diagrams in their notebooks to start character comparisons for the characters they were reading about. Another two met the teacher at her table for a quick small group.  Everyone else?  They returned to their seat, opened their notebooks to the next fresh page, and started reading.

Needless to say, I was impressed and I wanted to stick around.

I started to read over students’ shoulders as they paused (when they decided they were ready) in their reading to do some stop and jot reading notebook work.  What I saw was so impressive!  Students were independently choosing various reading responses to use in their notebook.  Most surprising to me was that students weren’t just jotting once.  The majority of students had chosen to do at least two different types of thinking that day.   For example, some predicted and then chose to do a character comparison.  Others created a suspect chart and wrote about character traits.  But all were reading…. and thinking!

This teacher, through meticulous patience and belief in the workshop model had created what we all strive for.  Her routines and expectations were working!

Look at this example from one student’s notebook:

Starting in the middle of the left page, this student did six separate thinking strategies (all dated 2/24/16). She wrote about book similarities, created a comparison Venn diagram, described a secondary character, named out how a character changed, summarized, and created a character web and attempted to include text evidence.

When I spoke with this student she told me that writing in her notebook helps her reading “go from good to great.”  That sometimes she doesn’t understand something, but then she will write about it and it would become much clearer.  She explained that she chooses what to do based on what Mrs. G has shown them before.  There is no menu of activities to choose from pasted into each reading notebook or listed posted on the board of what to do next.  Strategies had been instilled into each learner in the class and they were drawing upon that knowledge independently.

I moved over to another student who was sitting next to Mrs. G’s anchor chart, and from what it looked like, copying the chart into her notebook.  I asked what she was working on.  She gestured to the chart and told me that she was taking questions from the chart and answering them in her notebook.  And she was!  I remembered that she was one of the ones who had started a Venn diagram  earlier and I wondered if she had abandoned that task for this one.  I asked her about the Venn diagram.  She flipped back a page and said, “That’s right here.  I didn’t finish yet.”  And then after a moments pause, “But I guess I can use the answers to these questions…” She flipped back to the answers based off the anchor chart questions,  “…to finish filling in my chart.”  She returned to her Venn diagram with urgency and fervor.  I hadn’t even said a word.

After I picked my jaw up off the floor, I immediately went to commend Mrs. G.  She was making it happen! Her kids were readers and independent thinkers and doing all the things we want students to do in the workshop model!   I was so excited!

But Mrs. G was busy… quietly conferring with a student.

So, I tiptoed out with a smile on my face and let them continue doing their thing.  I felt assured in the good work that we do and the value of the workshop model.  It IS possible!  She had built it and they had come.

Let’s keep the conversation going-

Lindsay

The Burning Vocabulary Question Series: How do I teach vocabulary?

Happy New Year, to all!  My apologies for the long delay!  What’s my New Year resolution?? To not let so much time lapse between posts!  (lol).  Let’s get right to it!

If you forget where we left off, you can review the last two posts: The Burning Vocabulary Question Series: Where do vocabulary words come from? and The Burning Vocabulary Question Series: Which words do I teach?

So at this point, you’ve gathered a collection of words from authentic sources and you have chosen the best words for instruction.   Now, there is only one more question left to answer:

How do I teach the chosen vocabulary words?

Past vocabulary practices have been very teacher driven, where students are passive recipients of word knowledge. This usually includes:

  • vocabulary lessons confined solely to literacy time.
  • instruction governed by a commercial program’s manual.
  • approaches that are either definitional (looking up the meaning in a dictionary) or instructional contextual (briefly introducing words prior to assigned reading).
  • approaches  that assume that students have prior knowledge of  the topic.
  • words presented only once, with little time for deeper understanding.

As many of us implement reading and writing workshop within our classroom, we realize that the above mentioned practices are not the most conducive to how students learn best. For example, many of these practices conflict with known understandings of what 21st-century students need.  Within the workshop classroom, students are now at the center, where they can actively engage with their own learning.  This shift calls for some changes to our instructional practices when it comes to vocabulary.  Research has recommended a few differing practices:

  • a comprehensive approach, where vocabulary instruction is not an isolated event.
  • instruction that is dispersed across the school day.
  • active engagement by the student during vocabulary instruction.
  • allowing multiple opportunities to work with the words in different contexts.
  • placing emphasis on expanding student prior knowledge.
  • fostering strategies for independent word learning.

I’ll take a moment to note that although I believe in the workshop model, I disagree with the notion that vocabulary is learned incidentally through exposure to words in reading materials.  Practically, and through time spent in the classroom, I just don’t think “osmosis” is enough.  Hardcore workshop proponents might argue with me, questioning whether explicit instruction is inauthentic.  However, the word gathering means described in the first post of this series, The Burning Vocabulary Question: Where do vocabulary words come from?,  create an authenticity for learners.  Also students will come across many of the explicitly taught word in their independent reading and will use the words in their writing.  By making vocabulary instruction a part of each day, students will begin to notice words, and make learning and using them a part of their daily lives.  Which I believe, is in fact, very authentic!

I find it most helpful in the classroom, to start with an instructional framework and stick with it for a period of time.  The consistency provided gives the opportunity to streamline implementation routines and create a habit.  That being said, time should be spent creating a framework that works for you, within your daily schedule.  The focus should be kept on creating a framework for fast-paced, yet varied experiences with words, where multiple review opportunities are available to develop deeper understanding of the word meanings.

Your framework should have three components.

  1. Initial explicit instruction of each word using student-friendly explanations.
  2. Meaningful activities, over a couple of days, to engage students in using the words in a variety of contexts.
  3. Assessments that gauge students’ depth of knowledge about the words.

For example, my framework looks like this:

Weekly Vocabulary Instruction Framework

The idea is to spend 10-15 minutes per day to enhance vocabulary.  You will see that you and your students learn the predictable routines of the week and work through activities efficiently.  Again, sticking with a consistent framework will allow for quick delivery of instruction.

We can also not ignore the fact that teaching and learning vocabulary is a very complex process.

Effective vocabulary instruction requires a repertoire of teaching activities and instructional strategies coupled with the teacher’s ability to choose appropriately within this repertoire”

-Blachowicz, Fisher, and Ogle (2006)

 There is not a “one size fits all” approach to teaching words.  We should have a variety of different sources and strategies to pull from in order to meet our students’ needs.  Much akin to the work done during reading and writing workshop,  So to meet the needs of all learners, the follow-up activities mentioned in the above framework must be varied.

Possible Vocabulary Activities

  1. Example/Non-Example
    1. Present students with two situations.  Ask them which one exemplifies a given vocabulary word.
      1. For example:  Which would be an example of trepidation?
        1. Jumping into a swimming pool or hesitating before testing the water?
        2. Feeling confident about signing up for a contest or having uncertain feelings about signing up?
    2. Students need to explain their reasoning.
  2. Word Association
    1. Present students with situations that go with targeted words.
      1. For example: restrictions, awe, endured
        1. When I applied for a library card, I was surprised by all of the rules that I had to follow just to borrow a book.
        2. Walking into the dinosaur exhibit at the museum for the first time, I was amazed by the huge skeletons.
        3. When I read a biography of Ghandi, I marveled at all the trials that he had to face.
    2. Students need to explain their reasoning.
  3. Generating Situations, Contexts, and Examples
    1. Students create situations and contexts for given words.
      1. For example: dignity, prejudice, humiliation
        1. How might a losing team maintain its dignity?
        2. What is an example of someone acting with prejudice?
        3. How id Marian Anderson face the humiliation of not being able to stay in certain hotels?
  4. Word Relationships
    1. Students place vocabulary words on a continuum and explain their choices.
      1. For example:
        1. Positive: awe, dignity
        2. Negative: prejudice, humiliation
  5. Writing
    1. Students complete various sentence stems
      1. For example:
        1. There were many restrictions for using the gym because _____.
        2. The decorations for the graduation ceremony were awe-inspiring _____.
        3. He had an unwavering faith in his sister’s ability because _____.
  6. Vocabulary Pictionary
    1. Students choose a word from the word wall to illustrate.
    2. Classmates must identify the word from the illustration.
  7. Vocabulary Tic-Tac-Toe (or BINGO)
    1. Fill a 3 x 3 grid with vocabulary words.
    2. Students draw an X through the word when the definition is called out.
  8. Choose a Side
    1. Choose two words that have similar meanings.
    2. Say aloud a sentence where only one word fits.
    3. Students move to stand on one side of the room or the other to show which word they believe fits the sentence (or stand in the middle if they are unsure).

One last thought…

We need to make sure that our classrooms are energized, verbal environments.  We want words to not only be noticed, but also celebrated.  Make sure you room is print-rich and there is access to dictionaries and thesauruses.  Do everything you can to make sure students are curious about words and putting in the effort to discover words and how they work.

Let me know how you do as you implement explicit vocabulary instruction into your workshop.  What does your vocabulary instruction looks like already?  Do you have other vocabulary activities to add to my list?

Let’s keep the conversation going-

Lindsay

The Burning Vocabulary Question Series: Which words do I teach?

During the first part of this series, I outlined specific places where authentic vocabulary words could come from.  That list includes:

  1. Your current mentor texts
  2. Student’s independent reading novels
  3. Student’s writing

So, now, you’ve put systems into place and you’ve acquired a bunch of individual words to choose from for explicit vocabulary instruction.  You are most likely thrilled to have so many words at your fingertips!  However, when confronted with a long list of “good” vocabulary words, we know that it would be impossible to teach them all in an already packed school day.  We know that of all the possible words, we must select a small number of words for explicit instruction, but that can be frustrating.  Deciding which words to teach is challenging!  Similar to the lack of information regarding what words to teach discussed during the last post, the Common Core State Standards also do not say anything about how to identify the specific academic and domain-specific words to teach.

There are various types of words to consider for instruction:

  • words that are essential for comprehension of a specific text
  • words that are important for developing a broader reading and writing vocabulary (but are not directly linked to a specific text)
  • common words that students with a limited vocabulary are unlikely to know
  • words that represent themes in narratives or key concepts in informational texts (but are not included in the selection)
  • words with important structural features

Teachers are left wondering,

“Which words do I teach?”

Since we are working with words that have been authentically gathered from individual classroom sources, Beck and McKeown’s tier system would work best for selecting words for vocabulary instruction.  This system sorts words into three tiers or levels, as pictured below.

Created by Lindsay Barna literacycoachmusings.wordpress.com
Created by Lindsay Barna    literacycoachmusings.wordpress.com

Beck and McKeown recommend teaching Tier 2 words.  Unfortunately, there is not a magical list of Tier 2 words (sigh), nor do Tier 2 words have grade-level designations.  However, Linda Kucan’s article “What is Most Important to Know About Vocabulary?” (The Reading Teacher, Vol 65, Issue 6, 2012) gives guidelines for evaluating if words fall into the Tier 2 category.

Evaluation Criteria for Tier 2 Words

  • Students do not ordinarily use the word or hear the word in daily speech, but it is often encountered in books.
  • Students have knowledge or experience that would help them understand the word.
  • The word frequently appears in texts across a variety of content areas.
  • The word is useful or important for comprehending and writing about important ideas in a selection
  • The word can be worked with in a variety of ways (students can build rich representations of the word as well as connect it to other known words)

Here is a list of possible vocabulary words I pulled from Mrs. Mack by Patricia Polacco (guided reading level P).  Which word would you select for explicit instruction using the criteria outlined above?

Mrs Mack Vocabulary

I chose shabby, contours, coaxed, lurched, plunge, mount, yearned, and summoned. But remember, there is no “correct” answer.  Selecting one word over another is up to each teacher and which words s/he thinks will get the most bang for their buck within the individual classroom.  I chose these words because they will help students when they are reading and writing about ideas from the text and are words that are seen often in other texts. Many of these words can also be used in multiple contexts, so students will be able to construct high-level mental representations of each word. Some of the remaining words, especially those pertaining to horseback riding, are potential Tier 3 words.

I outlined how to do this selection process with a class mentor text.  We can use this same approach with words that have been spotlighted from student writing and suggested by students from their independent novels.

Now you have a clearer view of how to select vocabulary words, but you may still be plagued by one small nagging question,

“How many words should I choose?”

The total number of words to teach students weekly will depend on the actual students sitting in your classroom.  Your judgement and instructional goals will play a large part in the amount of words chosen.  Think about your students’ existing vocabularies and general language skills,  as well as the complexity of the average text experienced (by students during independent reading and through class readings).

A good target would be for students to learn about 500-600 words per school year.  Very roughly, that would translate to 12-15 words a week.  But fret not- this does not have to happen solely within your literacy block!  We can assume that students are learning words in other content areas besides literacy.  When learning about Landforms in  Social Studies, students will learn word such as plain and plateau, or in a math lesson, students might learn the word product or quotient.  So, it might be reasonable to say that in literacy, students should be explicitly taught 10 words a week.

I might pull 3 words from those suggested by students from their independent novels, 3 words spotlighted in student writing, and 4 from the current mentor text each week.

Once you’ve narrowed down your word selections, you are ready for the final step of the process- the actual instruction.  Best practices in vocabulary instruction will be the last installment in this series.  You’ll finally be able to put this behind-the-scenes work into action!

How many vocabulary words do you teach a week?  What words would you have chosen from my list from Mrs. Mack by Patricia Polacco?  Leave me a comment!

Let’s keep the conversation going-

Lindsay

Skills Vs. Strategy

Throughout my teaching career, there was something that I always had trouble wrapping my head around: the difference between a skill and strategy.  Like many educational terms, the definition depends on who you ask, so it was always a bit murky to me.

During my time working on various curriculum writing committees, I started running with my own definition of the terms…

To me,

  • a skill is “content” necessary  for reading understanding
    • narrative elements
    • character traits
    • main idea and supporting details
    • text structures
    • text features
      •  Nonfiction (index, heading, caption, etc)
      • Fiction  (stanza, line, stage direction, cast of characters, etc)
    • Etc.

A reader would have to know that all of these exist and they would have to be able to name them out in any given text.

  • a strategy is, well, a reading strategy.  Based off the work of Ellin Oliver Keene and Susan Zimmermann in their groundbreaking Mosaic of Thought, as well as Stephanie Harvey and Anne Goudvis’ Strategies that Work.
    • monitor comprehension
    • make connections
    • visualize
    • determine importance
    • Etc.

And so, I, Lindsay Pish, classroom teacher also threw my definition out there– adding to the myriad of voices.

However, in my work as a literacy coach I’ve come across some other definitions that have gotten me thinking about how my working definition might fit into the mix. Here are three others that I recently came across:

1. When I took this position as a literacy coach, I gained the responsibility of working with middle school teachers.  Middle school literacy was a new territory for me so I did a lot of professional reading on the subject, including Teaching Reading in Middle School by Laura Robb.

Robb describes strategies as the internal reading processes used to make sense out of print, while skills are isolated and out of context drills.  “Strategic reading means that when the learner practices a strategy, he has a conscious, in-the-head plan for comprehending, whereas skills are used without conscious planning.”  For example, students are told to practice a skill on a worksheet, but decide to use a strategy during their independent reading.  Skills are basic practice and can only be elevated to the level of strategy by linking practice to the student’s personal reading life.  “As students use strategies, they become more and more aware of their reasoning process as they make sense out of print, skills seldom involve this kind of self-awareness.”

This could somewhat fit with my definition of each.  The skills are the isolated parts of reading content, identifying narrative elements or text features, that are used to complete the more complicated strategies, inferring or synthesizing.  So you would have to have knowledge of the skill to consciously use a strategy.

2. While doing research for a new strategy-based resource curriculum that I am writing, a fantastic teacher let me borrow the book, Strategy Instruction for Students with Learning Disabilities by Robert Reid, Torri Ortiz Lienemann, and Jessica L. Hagaman.

In their book, the authors define a strategy as being facilitative, essential, willful, and effortful.  Meaning that strategies facilitate performance or help do a task better–easier, more quickly.  They liken a strategy to a tool.  Tools help us do a task “to a higher standard with much less effort” and strategies do the same.  Strategies are essential in that they are are necessary for success.  The highest achieving students use strategies.  In turn, these students make a conscious effort to use a strategy and commit to its use.

The authors go on to say that a strategy is a “cognitive process that occurs inside our head” and often one strategy is used in combination with another.  The point of strategy use in the classroom, according to this text, is to help structure the effort put into a task and to act as reminder for what the next step in the process is.  The conclusive definition of a strategy in this book then becomes, “a series of ordered steps that help a student perform a task.”

While I agree that strategies are facilitative, essential, willful, and effortful–a process that happens entirely in our head,I am not sure that I agree with strategies acting only as a series of ordered steps, likened to the the use of a mnemonic device to remember the steps in a math computation (“Please Excuse My Dear Aunt Sally”- parenthesis, exponents, multiplication, division, addition, subtraction).  I would feel uneasy boiling down something as complicated as synthesizing two texts, into such a simplified process because I want to make sure that deeper understanding is present.

3. Finally, as a blogger I make sure that I keep up with other literacy-based blogs.  Recently blogger Annemarie, on Teacher2TeacherHelp did a series of posts on teaching strategically.

Annemarie would agree with the definition put forth by the authors of Strategy Instruction for Students with Learning Disabilities.  She describes strategies as a mean to proficiently perform a skill.  Using Jennifer Serravello’s definition (from Teaching Reading Skills in Small Groups: Differentiated Instruction for Building Strategic, Independent Readers) that “strategies are the step-by-step how-tos for internalizing skills,” Annemarie explains that strategies are scaffolds put in place to help with the development of skills, and left in place only long enough for the student to become independent with the skill.

When a student has trouble with a skill, Annemarie describes how she asks herself, “How can I break this down?” and then works to find ways the skill can be broken down into manageable steps.  She reminds teachers to focus on their process for doing things, by listing across their fingers, “First, I…Then…Next, I…” to make internal processes more apparent.

Again, it boils down to the use of a step-by-step process.  However, I feel a bit more comfortable with Annemarie’s explanation, since I can see how it would work with say, determining the main idea.  The student has trouble with this skill and I can break that task down into steps:

  1. First, ask yourself what this passage is all about.
  2. Then, decide what the author is trying to tell you about that topic.
  3. Next, ask yourself if this is something that the entire passage focuses on, or just a small part.
  4. Finally, ask yourself what details you can find to support that idea.

The thinking behind the skill is being broken down, rather than the rote use of something like a mnemonic device.  And through my work with Teachers College Reading and Writing Project, I know that this definition would be their philosophy as well.  Their teaching points follow the form of, “Today I am going to teach you how to (a skill) by using ( a strategy).”  And that makes sense to me.

I also understand that skills can be leveled into a heirarchy, like Bloom’s Taxonomy or Webb’s Depth of Knowledge.  Identifying text features is a low level skill, where as using text features to determine the main idea is a higher leveled skill.

So, where do I go from here? Now that I’ve completely muddled my own thinking…

I think I need to adjust my idea of what a skill is.  What I previously thought of as a skill, may be more of a topic or umbrella term, rather than an actual skill that students must aquire.  For example, one can not “narrative element”, but one can identify narrative elements or summarize using narrative elements.  Those are skills that could be supplemented with strategies in order for students to be successful at them.

This idea does not exactly tie in the comprehension strategies set forth in Mosaic of Thought or Strategies that Work, but maybe that’s okay.  I can accept the two different “types” and move forward.  Maybe like so many of our students, these terms do not have to fit into perfectly labeled categories.

What have you thought about on this topic?  I would love to hear your ideas or musings.

Let’s keep the conversation going-

Lindsay

An Invitation to “Geek Out”

My colleagues used to lovingly poke fun at me for the vast amount of reading I did on literacy education.  They would shake their heads at me when I showed up at lunch with a professional book; highlighter and pen in hand, “just in case” I had a spare second to read.  They giggled at the thought of me reading and annotating in bed at night, when most would use that time to unwind by watching TV or reading much lighter fare.  And they would playfully roll their eyes when I talked about my summer beach reading, which consisted of books on reading and writing workshop.  But through it all, their raised eyebrows and skeptical looks never bothered me.

I unabashedly love “geeking out” on literacy.

Despite their chiding, my colleagues saw the value of my obsession as well.  If anyone ever needed a specific professional book, I probably had it on my shelf–already read through, highlighted, tabbed, and annotated–or, brand-new and still in my “To Read” pile.  When they wondered about a particular strategy or methodology, I could usually answer their question and pass along a resource to aid in their quest.  And our conversations about classroom practices grew much richer as I brought up ideas and theories that I had read about, and they learned along with me.

Due to the instructional gains I’ve seen from teachers who read widely about their field, it has become obvious to me that continuing our professional growth is an extremely important aspect of our lives as teachers.  It is especially one that we must perpetually work at in the ever-changing world of literacy education.

Penny Kittle recently tweeted an article by Rob Jenkins, from the Chronicle of Higher Education, titled “The 4 Properties of Powerful Teachers”.  One particularly poignant statement reads,

You must continue your education on a regular basis — by reading extensively in your field, attending conferences and seminars, conducting and presenting your own research, and remaining a practitioner of your art or science. You must also continue to learn and grow as a teacher by exploring new advances in pedagogy and technology that can help you in the classroom.

And in the short term, to be a powerful teacher you must go into every single class meeting as prepared as you can be, given the time you have. That means more than just reviewing your notes or PowerPoint slides. It involves constantly reassessing what you do in the classroom, abandoning those strategies that haven’t proved effective, or are just outdated, and trying new ones. It means being so familiar with your subject matter that you can talk about it off the cuff.

Some of that will come with time, as your level of familiarity with your subject will naturally increase the more you teach it. Then again, just because you’ve been teaching a course for 15 or 20 years doesn’t mean you shouldn’t approach it each term as if for the first time. It’s that level of preparation that allows great teachers to make it all look so easy.

(for the full article, click here)

Along with accepting new knowledge, we must also be open to the inevitable changes that will come about as new advances and understandings are made in the literacy field.  To be a truly great teacher, we must be open to the possibility that “our way” might not necessarily be the best way for our students.  That does not mean that we should wholeheartedly grasp onto every flash-in-the-pan theory that is presented, but that we should take the time to think about, evaluate, and possibly learn from each one.  A professional is, and always will be, a life-long learner within their field, even when they’ve been in that field for years.

So, whether you read professional books, follow educational blogs, or seek out every PD workshop you can in your area, I invite you to “geek out” with me, grow,  and share what you’ve learned.

Let’s keep the conversation going-

Lindsay